
Now that we know some of the basics of how to use Virtual Machine Manager, we are ready to review the initial steps for configuring a new VPS. We will do these steps on ns01 and you can repeat these steps on your own ns01 and ns02. Open VMM and right click on ns01 and select Run. Then click Open. Then log in with your username and password.
Update and Upgrade
One of the first and most important steps with any new Linux operating system is to update the system. On our VPS, we will use the VPS terminal. Type
sudo apt update
Then press Enter. Then enter your password and press Enter again. We the update is done, type:
sudo apt upgrade
Then press Enter. Then enter your password and press Enter again. Upgrade may add extra functions. In this case, neither the update or upgrade were really needed. Our VPS is up to date.
Set Up SSH to connect to a remote Linux server
SSH stands for Secure Shell. It is a tool used to connect a client which is your home or office computer to a Linux server which may be located 1000 miles away. SSH allows you to securely transfer files and programs to the server and change the settings on the server. SSH is a way to access your VPS remotely from your home or host computer terminal rather than from the VPS terminal.
Prerequisites
Before you can establish a secure connection with a remote server there are a few basic requirements to meet:
1...Your home computer and server SSH applications need to be installed and enabled.
2… The remote server must be turned on and have a network connection and be set up to listen to the correct SSH port or channel.
3… You need the IP address or the name of the remote server you want to connect to.
4… You need to have the necessary permissions to access the remote server.
5…. Firewall settings need to allow the remote connection.
6… While you can typically connect to the Internet via a WIFI wireless connection, if possible, use a wired Ethernet connection that is plugged directly into your router. This is especially important if you have a marginal WIFI signal. Ethernet is much more secure and more stable than WIFI.
How SSH Works
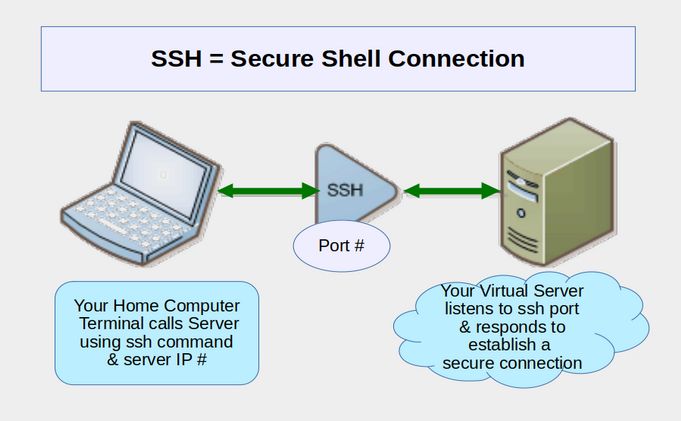
In order to establish an SSH connection, you need two components: a home computer SSH component and a server-side SSH component. An SSH client is an application you install on your home computer which you will use to connect to a server. The client uses the remote server information to initiate the connection and if the credentials are verified, an encrypted connection is established between the client and the server.
On the server’s side, there is a component called an SSH daemon that is constantly listening to a specific IP port for possible client connection requests. Once a client initiates a connection, the SSH daemon will respond with and the two will exchange their identification data. If the provided credentials are correct, SSH creates a new session to connect you to your remote server.
How to Enable an SSH Connection
Since creating an SSH connection requires both a client and a server component, you need to make sure they are installed on both the local and the remote computer.
An open source SSH tool—widely used for Linux distributions— is OpenSSH. Installing OpenSSH is relatively easy. It requires access to the terminal on the server and the computer that you use for connecting. Note that Debian does not have SSH server installed by default.
How to Install an OpenSSH Client on your Home computer
Before installing an SSH client, you should make sure it is not already installed on your Linux computer - as some Linux distributions come with an SSH client already installed. For Windows machines, you can install a program called PuTTY which is an SSH client. However, you should be aware that Windows computers are not secure and cannot be made secure. I therefore do not recommend using a Windows computer to communicate with a Linux server. Instead, you should first change at least one of your Home computers from Windows to Linux and use the Linux computer to connect to your Linux server so that the entire process of controlling your online business data is protected by the Linux operating system.
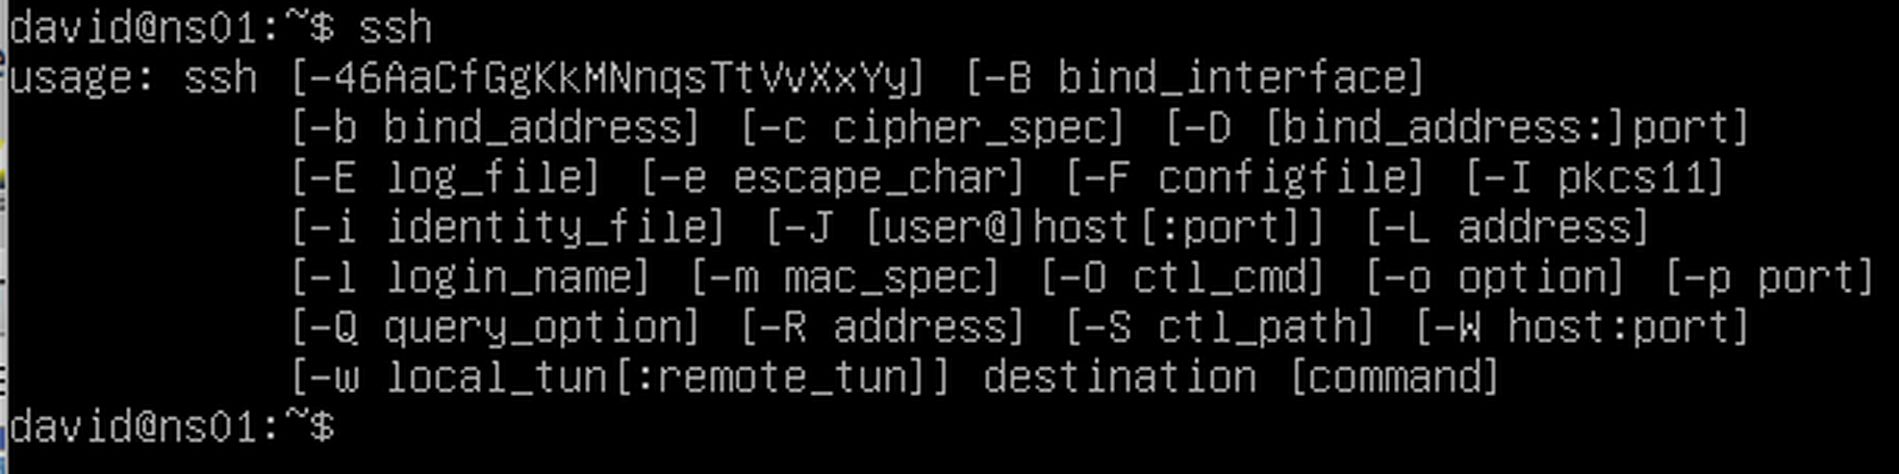
To check if the SSH client is already installed on your Linux home or business computer, open the Linux terminal on your Home computer and type:
ssh
Then press Enter. If the client is installed, you will receive a response that looks like this:
username (at) host:~$ ssh
usage: ssh [-46AaCfGgKkMNnqsTtVvXxYy] [-B bind_interface]
[-b bind_address] [-c cipher_spec] [-D [bind_address:]port]
….
Note that the user name is the name you use to log into your computer and host is the name of your computer as is shown before the prompt on your terminal. If you see a response, then ssh is already installed on your home Linux computer. Linux Mint Debian Edition 4 comes with SSH already installed. Close the terminal.
If you do not see this response or something like it, you can easily install the OpenSSH client by typing the following into your terminal:
sudo apt-get install openssh-client
Then press Enter. Type your password. Then press Enter again.
If you already have ssh installed on your home computer, then you should check the hidden ssh folder to make sure that it does not already contain any existing keys from previous connections that might interfere with the new connection. To do this, open your file manager, right click and click Show Hidden folders. Then scroll down to the hidden folders and open the .ssh (dot ssh) folder. Then open the known_hosts file. Delete any ssh keys that might be there. Then save and close this file. Then right click on the file manager screen and uncheck Show Hidden Files. If there is not yet a dot ssh folder, then there are not yet any hidden ssh keys to worry about. Close the file manager.
How to Install Open SSH to your Linux Server
In a previous article, we have explained the benefits of installing and using the Debian operating system to create a Debian server. One of the steps in the installation process is to check a box to install SSH on your new Debian server. If you checked that box, then SSH is already installed. To confirm this, open the Debian server and log in. Then type ssh after the prompt and press Enter. The terminal should reply with something that looks like this:
Note that the server username above is david and the server host name is ns01. Your server will have a different username and host name. If you are working with a real server, such as a Virtual Private Server on a cloud hosting account, you can access the server by logging into your hosting account.
Connect Your Server to Local Host
Another option to test whether SSH is installed on your remote server is to try to connect your server to the local host. In your server terminal, type ssh localhost and press Enter. For a server without SSH installed, the response will look like this:
username@host:~$ ssh localhost
ssh: connect to host localhost port 22: Connection refused username@host:~$
To install SSH on your server, type the following in the terminal:
sudo apt-get install openssh-server ii.
Hit Enter. Type in your password. Then press Enter again. Then type Y after the prompt. Then run the ssh local host command again.
For a server with SSH installed, the response will look like this:
username@host:~$ ssh localhost
The authenticity of host 'localhost (127.0.0.1)' can't be established. ECDSA key fingerprint is SHA256:9jqmhko9Yo1EQAS1QeNy9xKceHFG5F8W6kp7EX9U3Rs. Are you sure you want to continue connecting (yes/no)?
You should type in yes. If you wait more than about two minutes to type yes, the server will not accept your response. There is a way to increase this time limit which we will review in a minute. Type:
yes
The server will respond with: Warning: Permanently added 'localhost' (ECDSA) to the list of known hosts.
username@localhost’s password:
The password you need to enter here is your server password, not the password from your home computer. After entering the server password, press Enter. The server terminal will then reply with the normal server login response ending with the terminal prompt
We next need the IP address of your VPS. Type ip addr and press Enter.
The IP address for ns01 is 192.168.122.36. This is not yet a static IP address and thus can change. But we will deal with this issue later.
Now that we know the IP address of our VPS, power off the virtual machine by typing: sudo poweroff
Enter your server password. Then press Enter.
Set Up your Debian Practice Server SSH Network
Before we set up our server network, it is useful to determine our IP address on our Home or Host computer.
Determine your Home Computer IP address
Open a terminal on your host computer (your home computer) and type ip addr
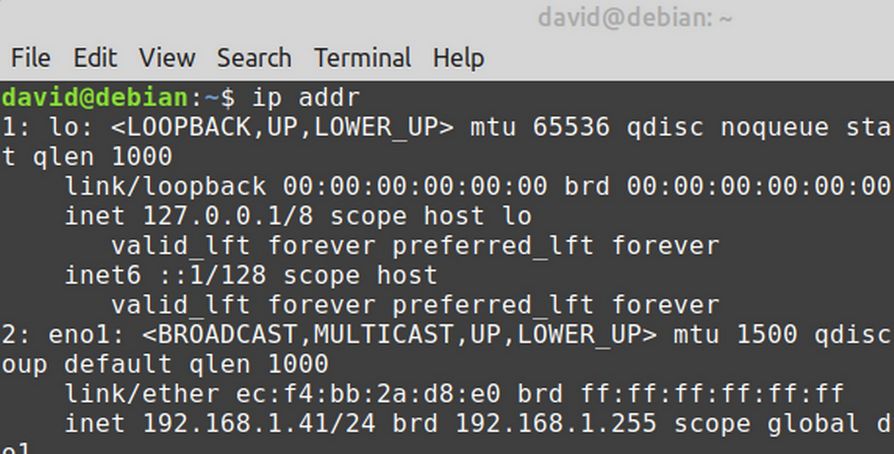
There are likely to be several connections. The first IP address is 127.0.0.1 which is the IP address for localhost. The second connection is called eno1. This is our Ethernet connection. The IP address is 192.168.1.41. Close your home computer terminal. Now that we know our IP address, we are ready to set up a connection to our practice Debian server.
Connect via SSH
SSH is like making a secure phone call from your home computer to your remote server. You typically connect remotely to the server via SSH to interact with it. Recall that the IP address for our server was
192.168.122.36
Turn on your server but do not log in. Then open your home computer terminal. The command from a terminal on your host or home Linux computer to create this connection is: ssh <username>@ip-address.
For example: ssh
Press Enter. Because this is the first time you are connecting via SSH with your server remotely, your home terminal will respond with
“The authenticity of host 192.168.122.36 can not be established. Are you sure you want to continue connecting?”
Type yes. Then press Enter.
The terminal will reply with
Warning: Permanently added 192.168.122.36 to the list of known hosts.
Enter the server password. Then press Enter.
The terminal on your home computer will respond with the same start information that is given on the practice server terminal. Note the change in the prompt. Instead of david at debian, it is now david at ns01.
Congratulations. You have now established an SSH connection to your practice server.
Hint: In the future, if the username on your home computer is the same as the username on your server, you can start an SSH session from your home computer with just ssh 192.168.122.36. You do not need to add your username.
One benefit of using SSH is that you may not be able to copy and paste some commands from your home computer to your server terminal. But you can copy these commands into your home computer terminal. So it is wise to learn and use SSH.
Configure your Server SSH Configuration File Port On
While we are using an SSH session, let’s make some changes to our VPS SSH configuration file. The server SSH config file is usually located at /etc/ssh/sshd_config. So type or copy and paste:
sudo nano /etc/ssh/sshd_config
Change Your Home Terminal Background Color
Because this file may be hard to read, let’s change the background color of our Home terminal. This will also help us tell our Home terminal from our VPS terminal. Click Edit, Preferences. Then click the Colors tab. Uncheck use colors from the system theme. Then change the theme to Black on White.
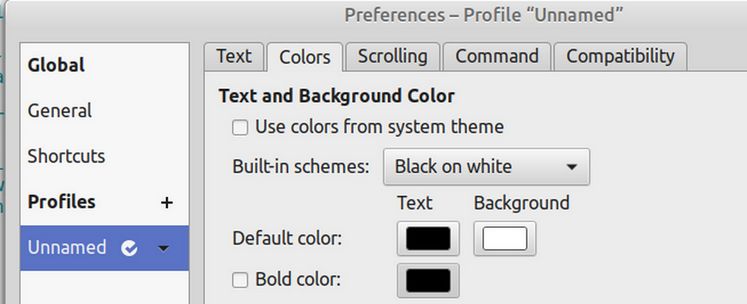
Then click Close. Here is the file:
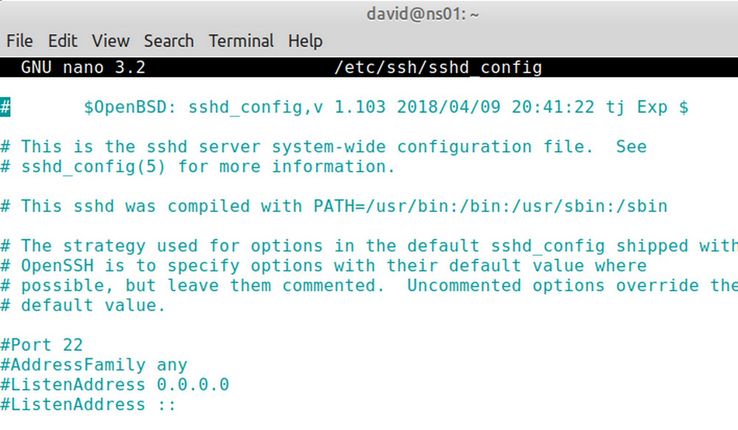
To scroll down the page, use the down arrow on your keyboard. The instructions explain that all of the values in this file have been commented by placing a hash tag (#) in front of each line. To make the line active, we want to delete the hash line. Because this is a practice server and we want it to listen to the default channel, which is Port 22, we will delete the hash in front of the line Port 22.
Had this been a real server, we would replace Port 22 with a much higher Port number as an added security measure. For now, just delete the hash and we will use Port 22. Use the down arrow on your keyboard to scroll down the screen to the hash tag to the left of Port 22 and click Delete on your keyboard.
Then scroll down to the line that says LoginGraceTime 2m
Delete the hash and increase the time to 6m
Then use the down arrow to go to the very end of the file. Then scroll back up a few lines. Here are the lines we want to change:
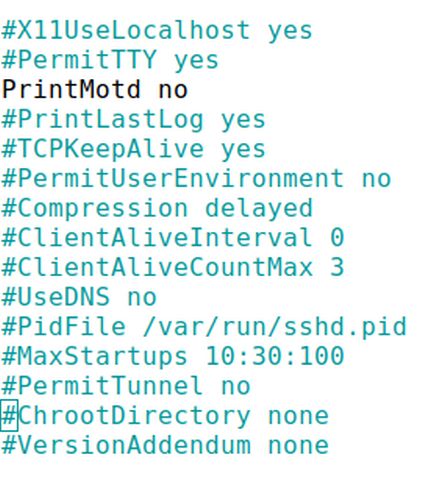
Use the up or down arrow to go to
#ClientAliveInterval 0
Delete the hash (#) and change the value to:
ClientAliveInterval 120
Then for the line below it, just delete the hash.
This will now send a client alive message every 120 seconds or every 2 minutes and will send this message if needed up to 3 times.
Press control plus the letter o then press Enter to save the file.
Then press control plus the letter x to close the file.
This will return is to our Debian server prompt.
Use sudo poweroff to close the server. Then close your Home terminal. Then use VMM to start the VPS again. But do not log in. This will help the changes we made to the configuration file above take effect.
Use the Shortcut Method to log into your Remote Server
If the username on your local machine matches the one on the server you are trying to connect to, on your home computer terminal, you can just type:
ssh server_ip_address
Then press Enter to establish an SSH connection.
Since the user name for my home computer is david and the username for my practice server is also david, let’s give this a try. First, turn on your server but do not log in. Here is what I enter on my home terminal:
ssh 192.168.122.36
Then press Enter. Then enter your server password and press Enter. Note the change in the prompt to david at ns01.
Type in your home terminal: ip addr
Then press Enter. It should reply with the server IP address and not the IP address for your home computer. To get more information about the server host name, type: hostnamectl
Then press Enter. It will reply with the host name ns01.
What’s Next?
If we were setting up a real server, we would next replace our SSH server log in password with keys. But since this is just practice, we will stay with our simple SSH log in password. In the next article, we will review how to use a special file manager called Midnight Commander.