
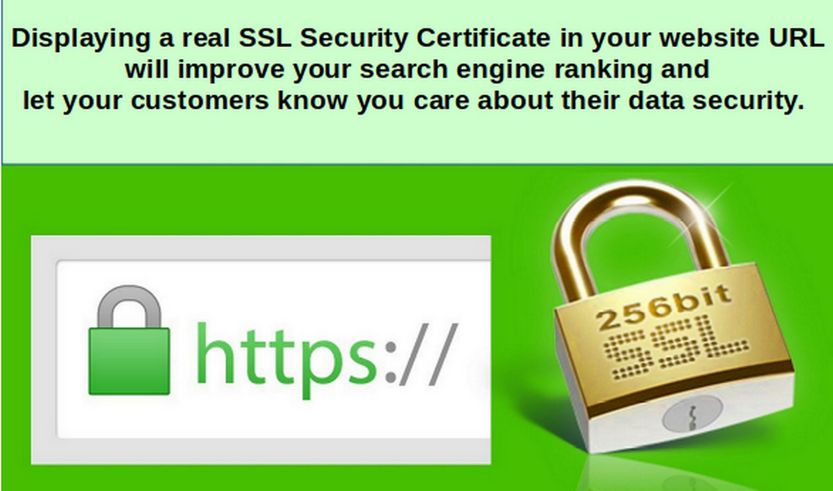
The next step in creating a secure business website is learning how to get an SSL security certificate for our website. SSL is an encryption process that will greatly improve data security for both us and for anyone who visits our website. Installing an SSL Certificate will also greatly improve your Search Engine Rankings.
So far, we have been using our home computer etc/hosts file to resolve local IP addresses. In our case, these local IP addresses begin with 192.168.1.xxx. We have then been using Hestia to create our own security certificates so that we can use SSL aka HTTPS with our fake local domain names.
However, on a real website using a real domain name, we want to create a real security certificate using a free SSL certificate process called Lets Encrypt (aka LE). Lets Encrypt will not provide a security certificate for a fake local domain name. LE will also not provide a security certificate for a domain name that does not properly resolve on the public Internet. This means that we can no longer just use our etc/hosts file to resolve the domain name. Instead, we need to create DNS records on a special file called a DNS Zone file. The DNS zone file will tell web browsers how to resolve the domain name on the public internet. Once the domain name resolves properly, we can then get a Lets Encrypt security certificate for our domain name.
Step 1 Get a real domain name from Canhost
The process of obtaining a real LE security certificate requires first obtaining a real domain name. Because we will eventually be using Canhost to run our real VPS, it is important to also get all of your domain names from Canhost and have Canhost host all of your domain names so that Canhost acts as the "domain registrar" for our domain names and so that we can use their DNS servers as the DNS servers for our domain names. In this example, I have registered the domain name localdevtest.com with Canhost (cost for each domain name is about $12 US per year). Before we can add the DNS Zone File to our Canhost domain name, we need to set up a public VPS and determine the public IP address assigned to our new public VPS.
Step 1 Start an SSH Session User and Reset the Root Password
Open a terminal on your home computer and type
ssh user-name@your-ip
At the prompt, type yes.Then type the password you gave Canhost when you created your VPS account. Once the session starts, type this command:
sudo passwd root
Type your new root password twice. Then type exit to close the User SSH session. Then start an SSH root session with
ssh root@your-ip
Use the root session to install Midnight Commander.
Edit the /etc/hosts file by typing:
127.0.1.1 ns1.localdevtest.com ns1
Note that the first domain in /etc/hosts should be your FQDN.
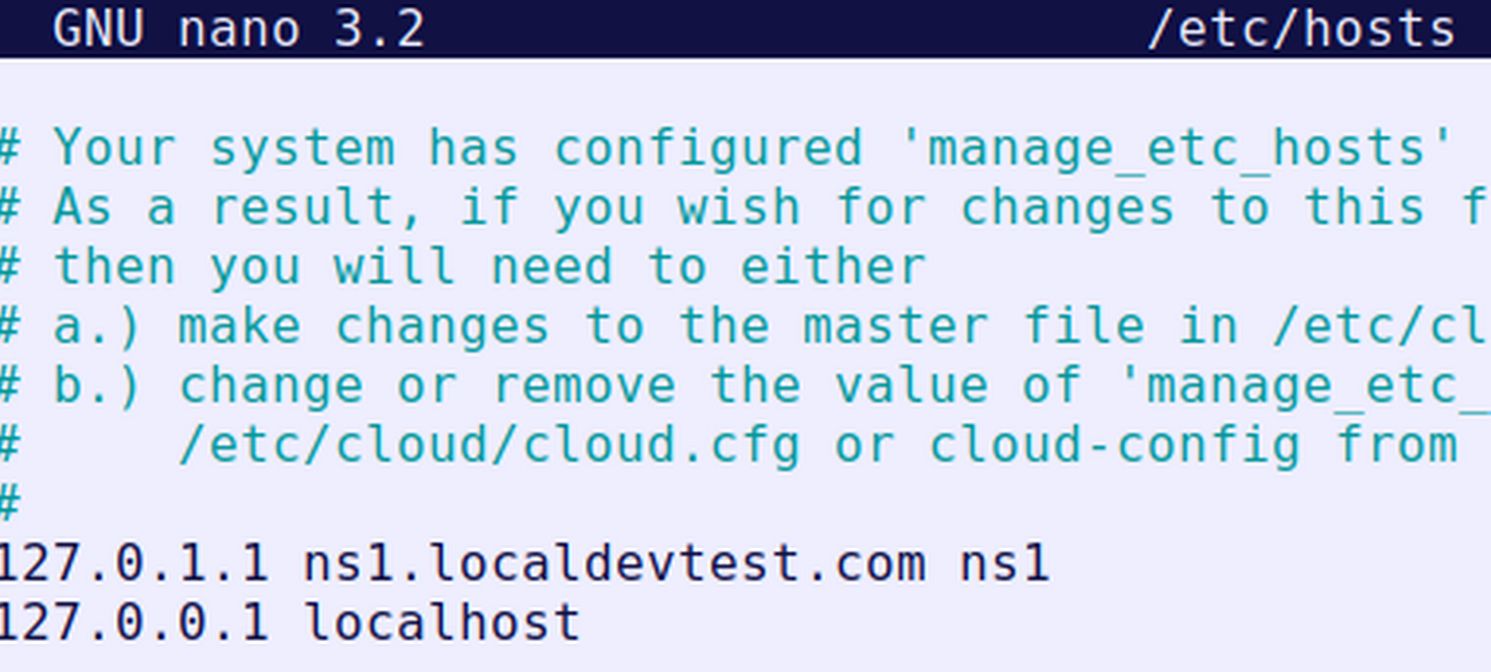
Save the file with Control plus lower case o, then press Enter. Close the file with Control plus x.
Verify your Fully Qualified Domain Name
-f is the flag for fully qualified domain name. This should output ns1.localdevtest.com
Then type exit to exit your SSH session. Then close the terminal.
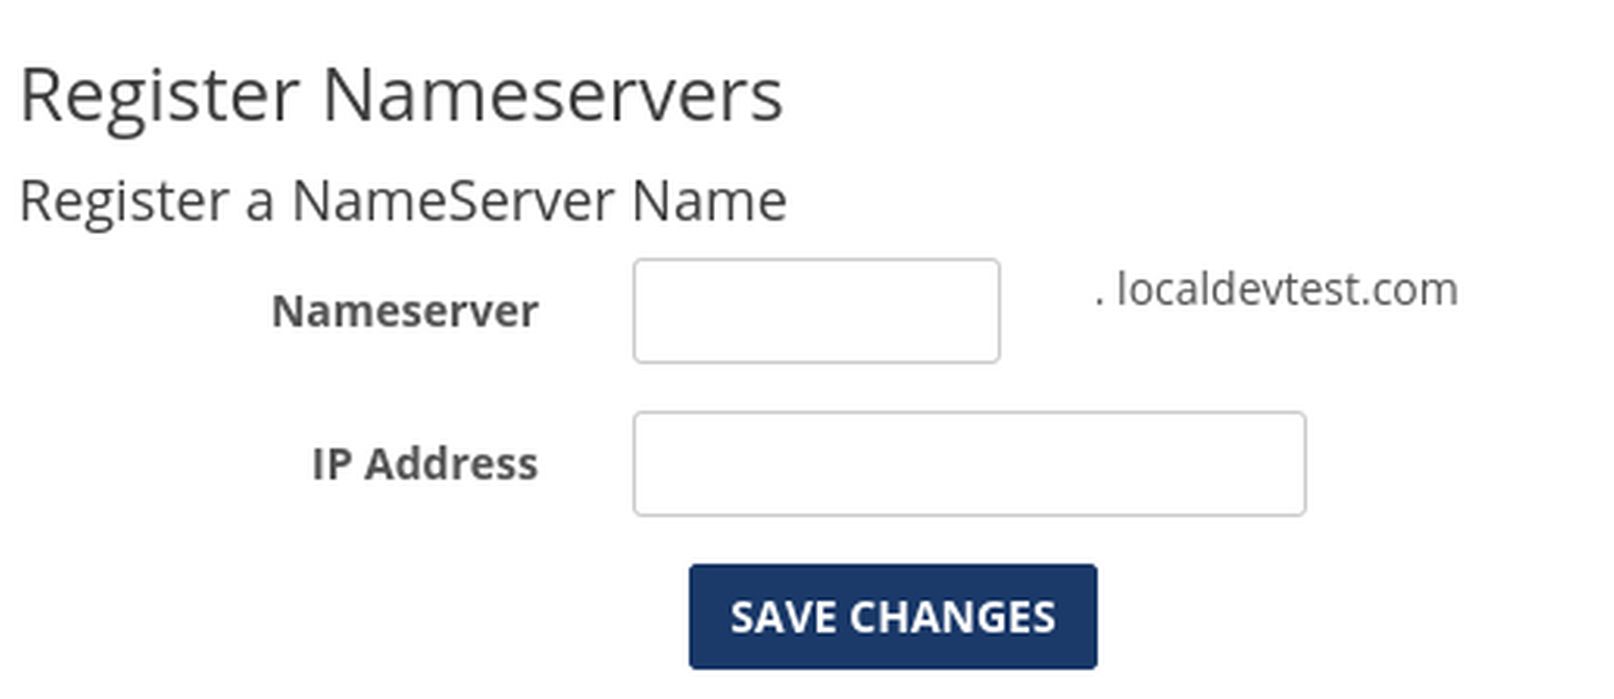
Call the Nameserver ns1 and copy paste the Canhost VPS IP address.
Then click Save Changes. Then repeat for ns2. Then click Manage DNS. Then click DNS Manager. Then click Add New Zone.
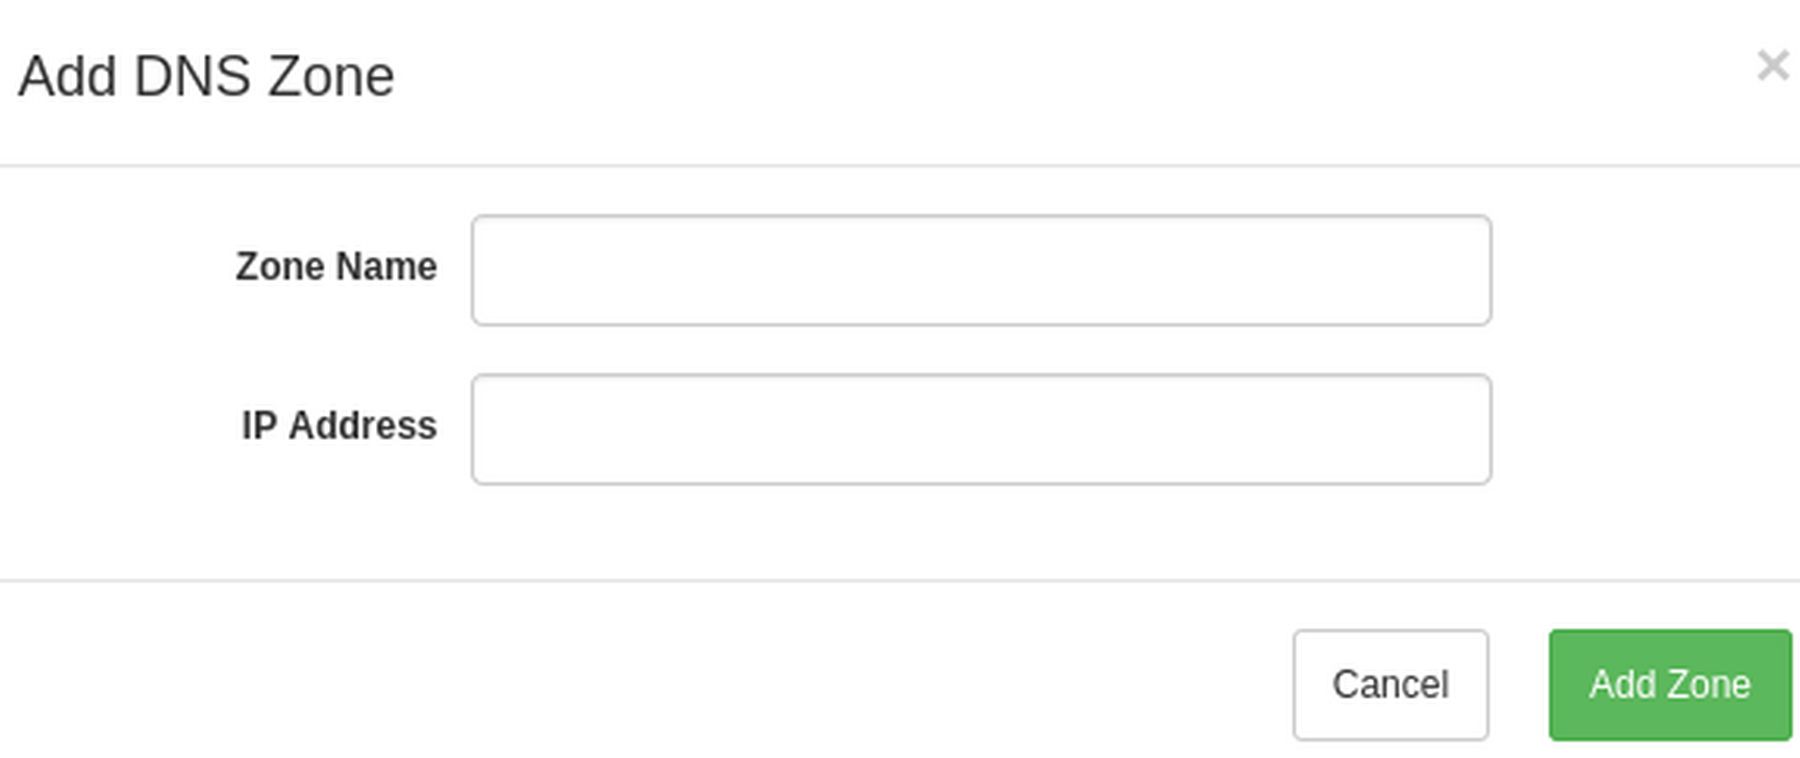
For zone name, use your domain name. For example, localdevtest.com
For IP address, use the IP address assigned by Canhost for ns1.
Then click Edit Zone to see the Zone Table:
There will be about 9 records in the table. This includes 4 Canhost Name Servers.
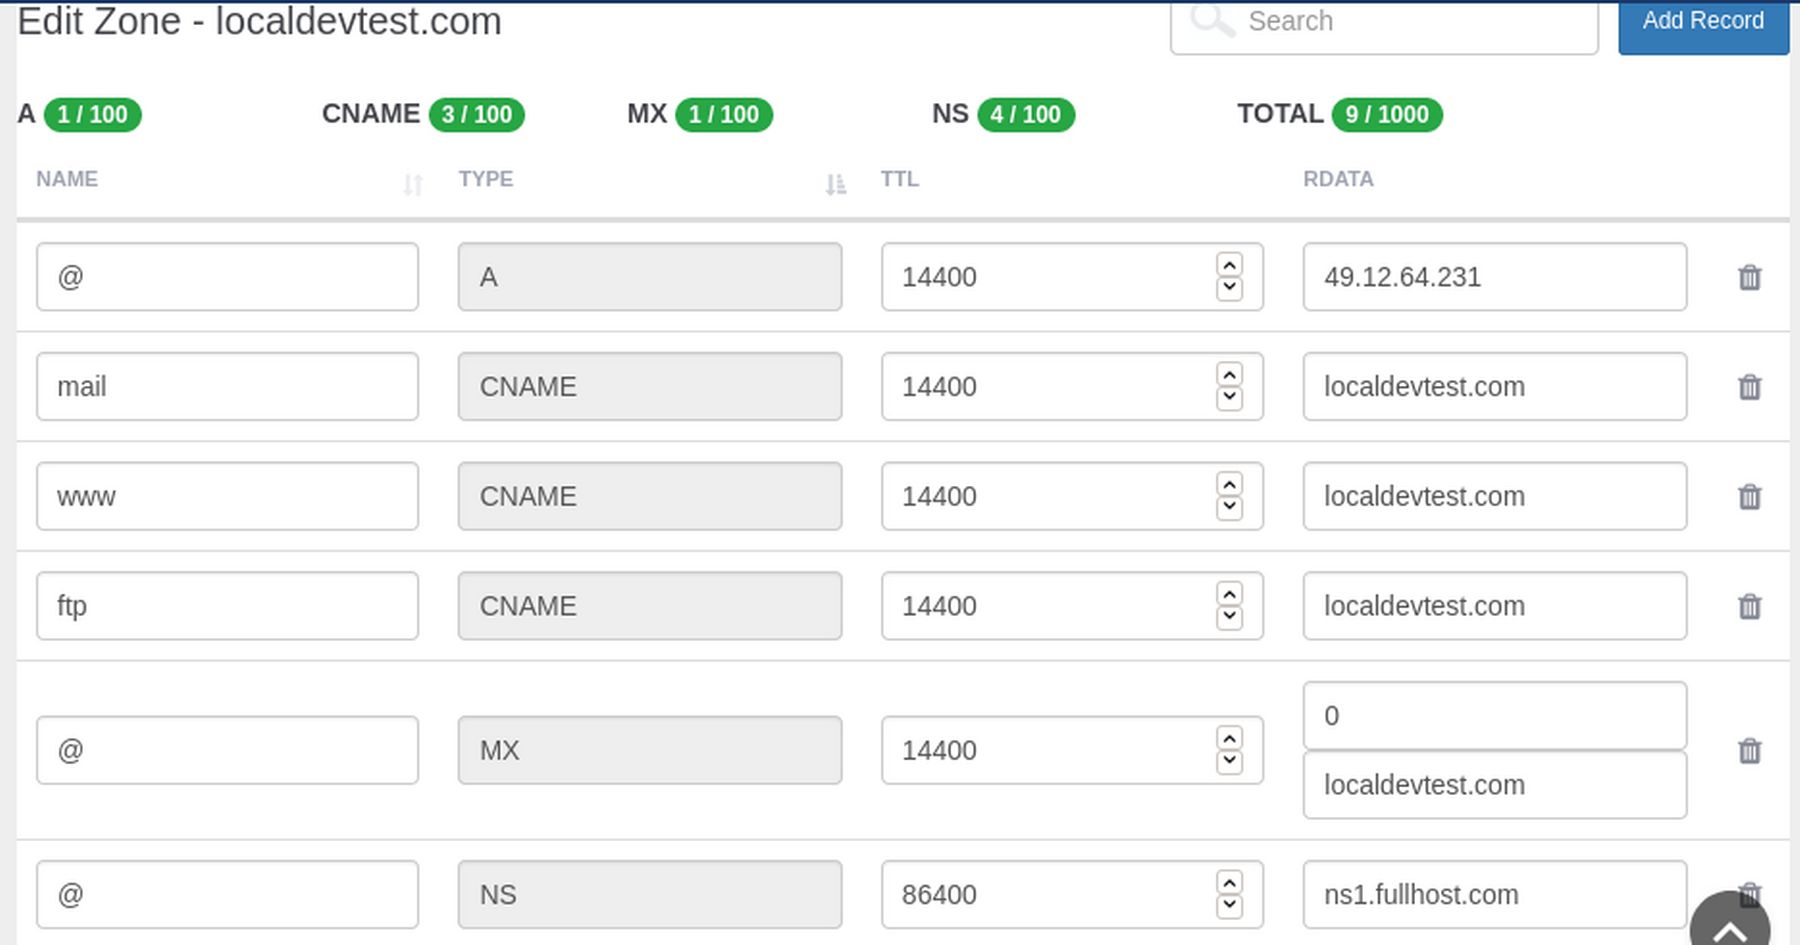
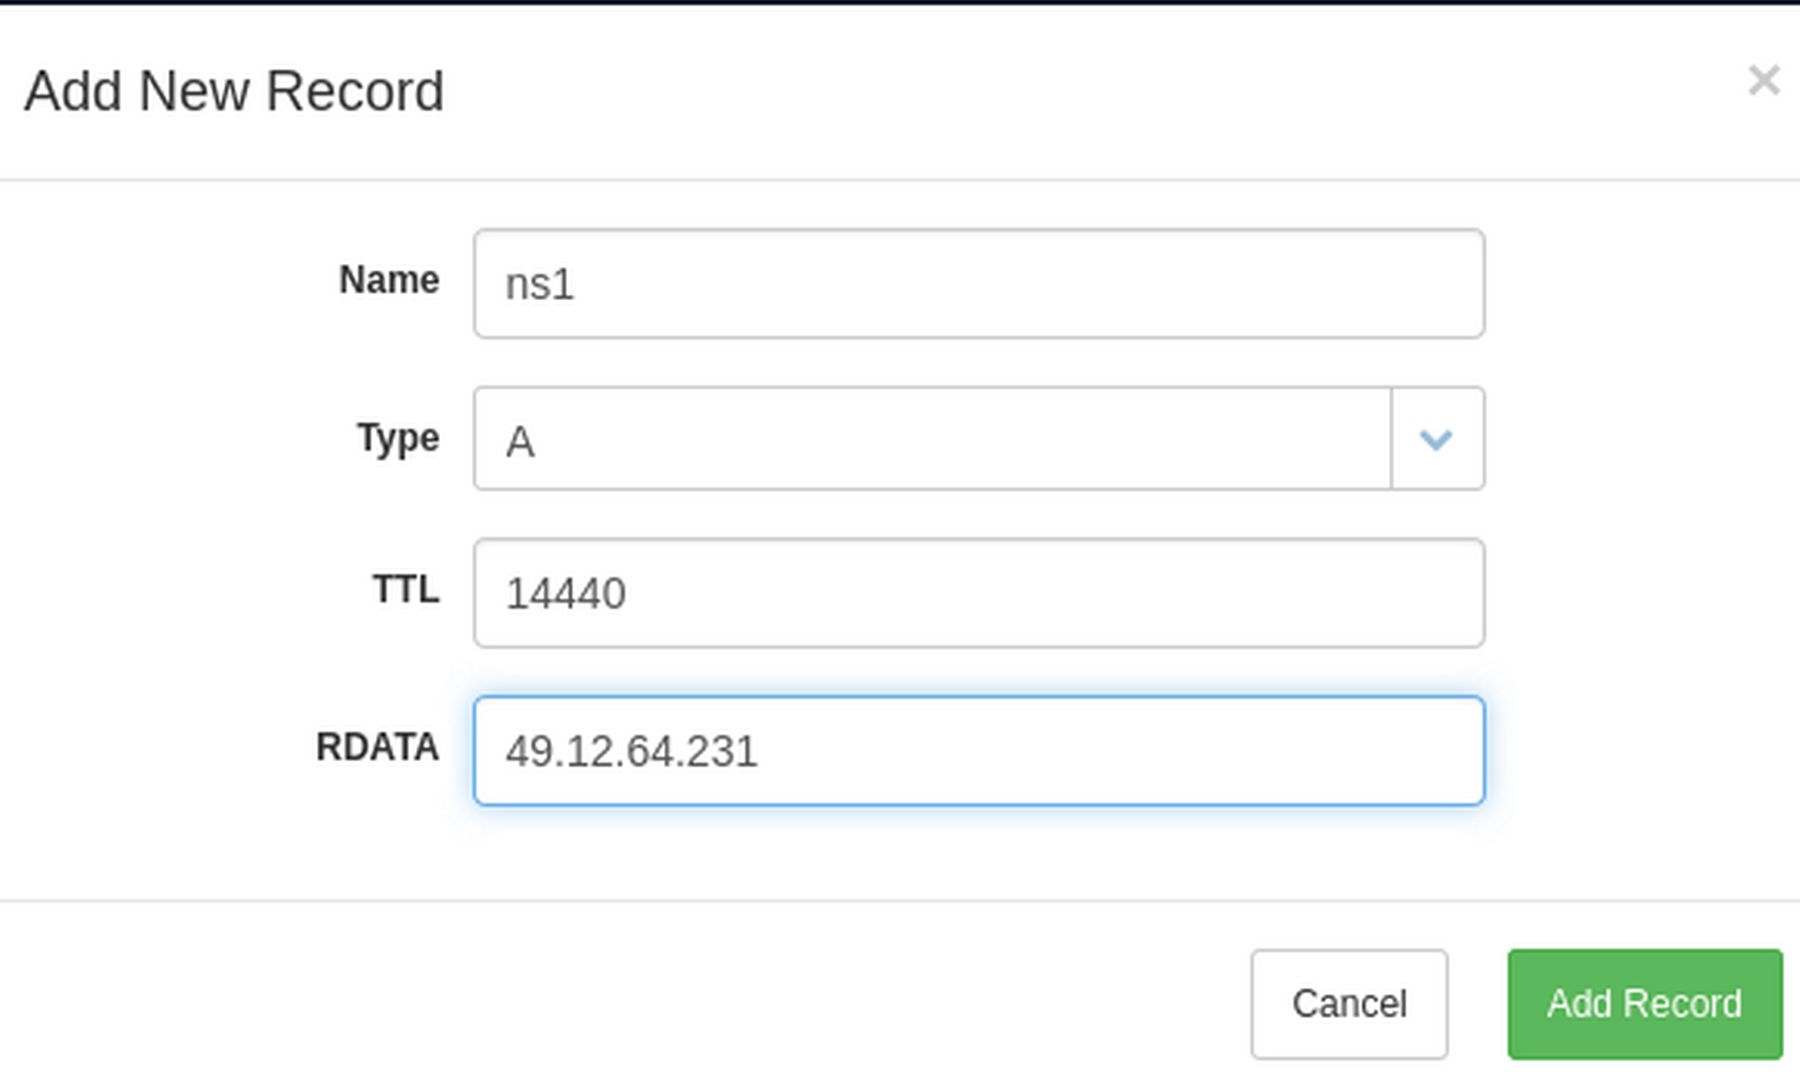
Click Add Record. Then repeat the above to add an A Record for ns2.
Open a terminal on your home computer and begin an SSH session as a root user with:
To download the installer, copy and paste the following:
wget https://raw.githubusercontent.com/hestiacp/hestiacp/release/install/hst-install.sh
To run the installer, copy paste the following:
bash hst-install.sh
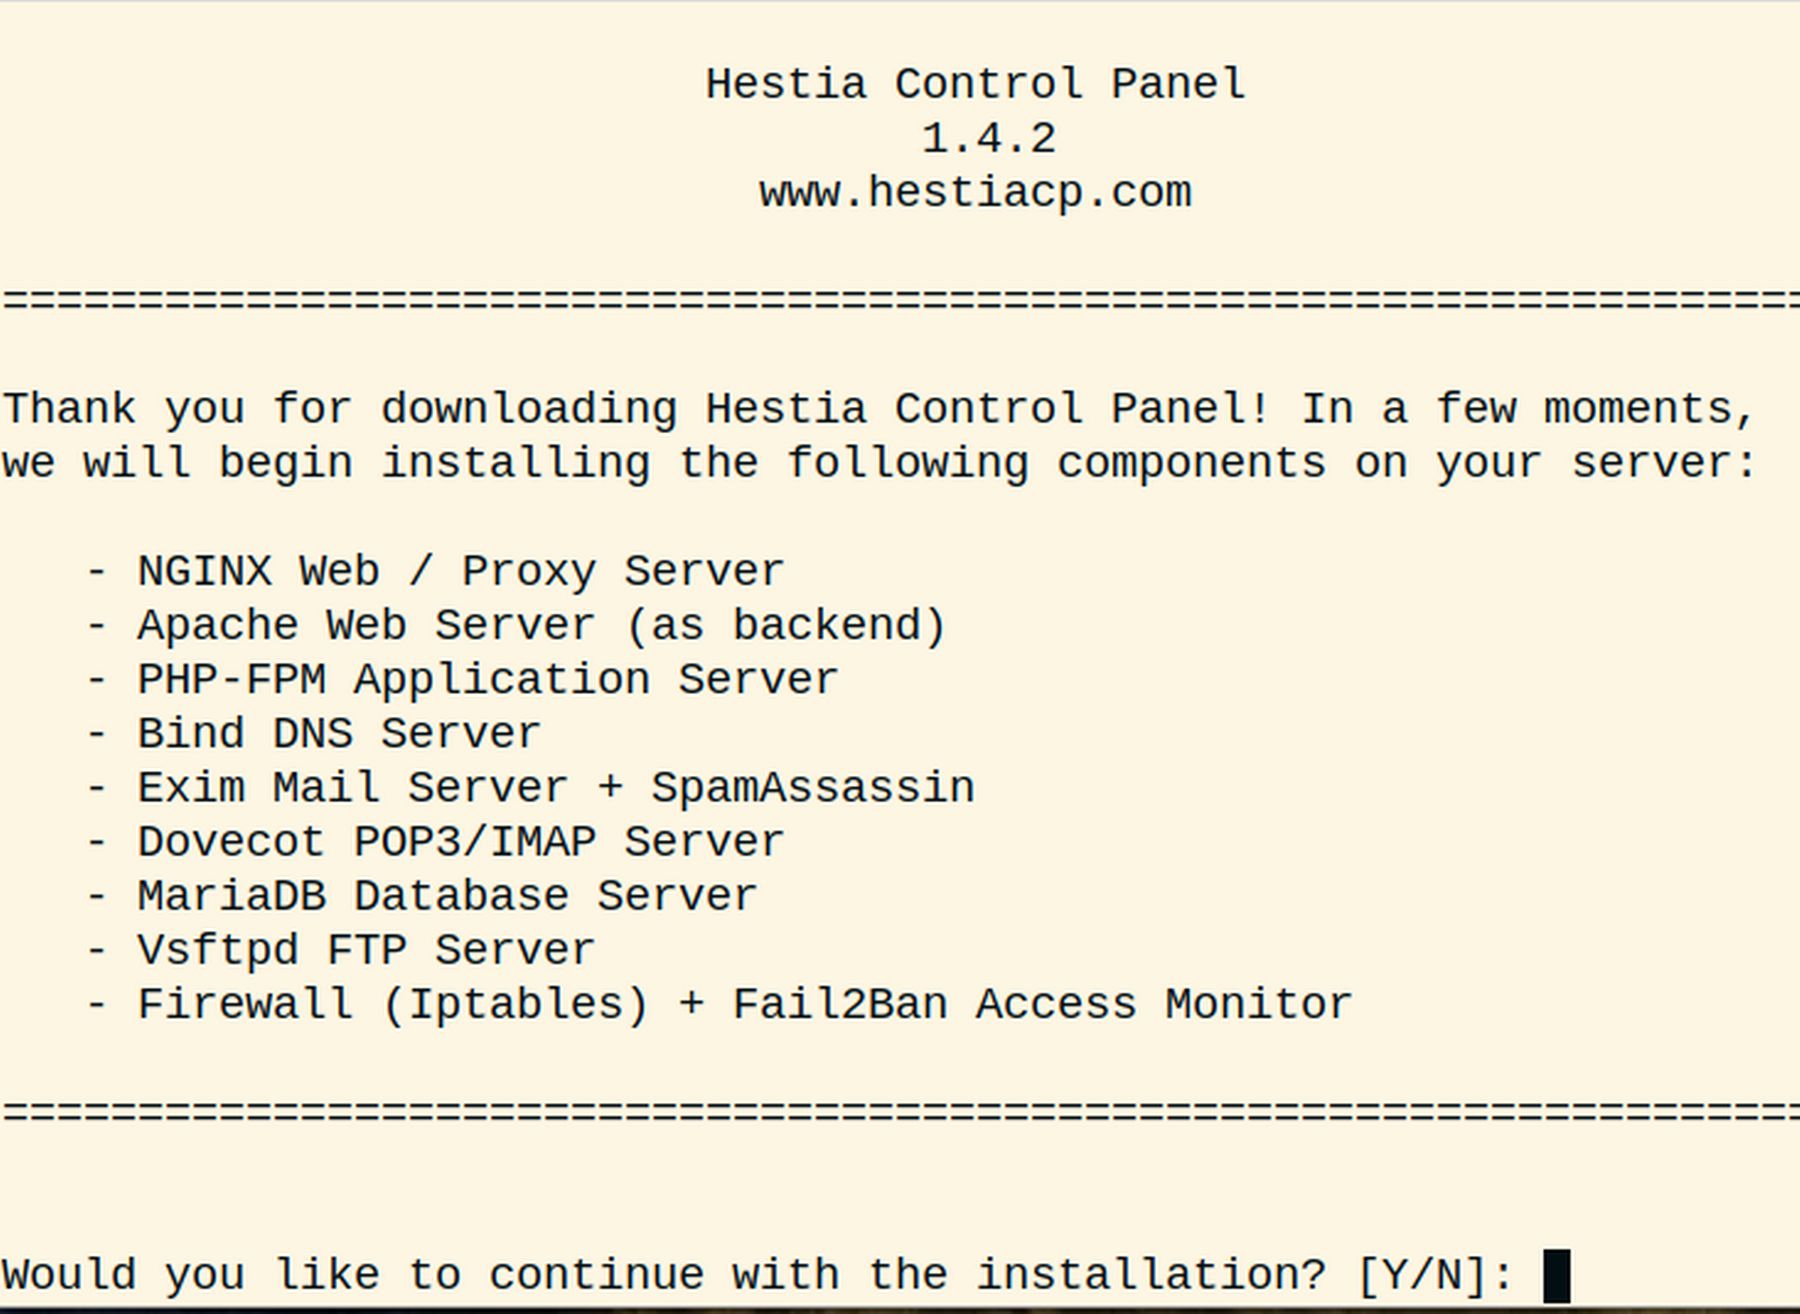
You will be prompted to answer three questions.
Do you want to continue? Type Y and press Enter.
Admin Email address? Enter your real email address. Then press Enter.
Fully Qualified Domain Name? Example: Type ns1.localdevtest.com. Then press Enter. It will then take about 10 minutes to install Hestia on your server.
The installation will end with: Press any key to continue... But do not press a key. Instead scroll up the page and copy paste this part into a Writer document:
Ready to get started? Log in using the following credentials:
Admin URL: https://ns1.localdevtest.com:8083
Username: admin
Password: LgMc5FHVlOtGQLfs
Only after saving the admin log in password, then press a key. It will take about one minute for the server to reboot. Then open a Firefox web browser and copy paste the admin URL.
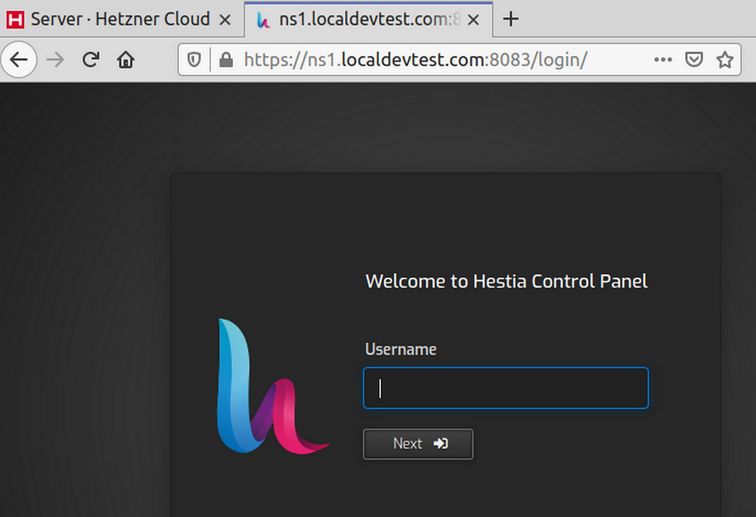
Note that the admin URL begins with https. Therefore, it has already been assigned a Lets Encrypt Security Certificate. For username, type admin. For the password, copy and paste the long password.
Step 8 Change the Control Panel Background Color
The dark background is hard to read and creates problems for taking screen shots. To change it, click on the Settings wheel. Then click Configure, Basic Options and change the theme from Dark to Default. Then click Save and Back.
Step 9 Change Admin User Password and Add a New User
Click Users. Select Admin and click Edit. Change the Password. Also click on Advanced Options and note that the default servers are correctly listed as ns1.localdevtest.com and ns2.localdevtest.com Click Save and Back. Then click Add User. Then add a user name and password. Check Send welcome email to see what that looks like. Then click Save and Back. After creating the user, click on the user to edit their rights. Advanced Options show nologin. Also show default servers as ns1.localdevtest.com and ns2.localdevtest.com.
To verify server domain name is working, click on Web. There is one domain name which is the name of your server. Select it and click on the up arrow to go to the server page:
Close this web page tab. Then log out of the admin page. Then log into the user account.
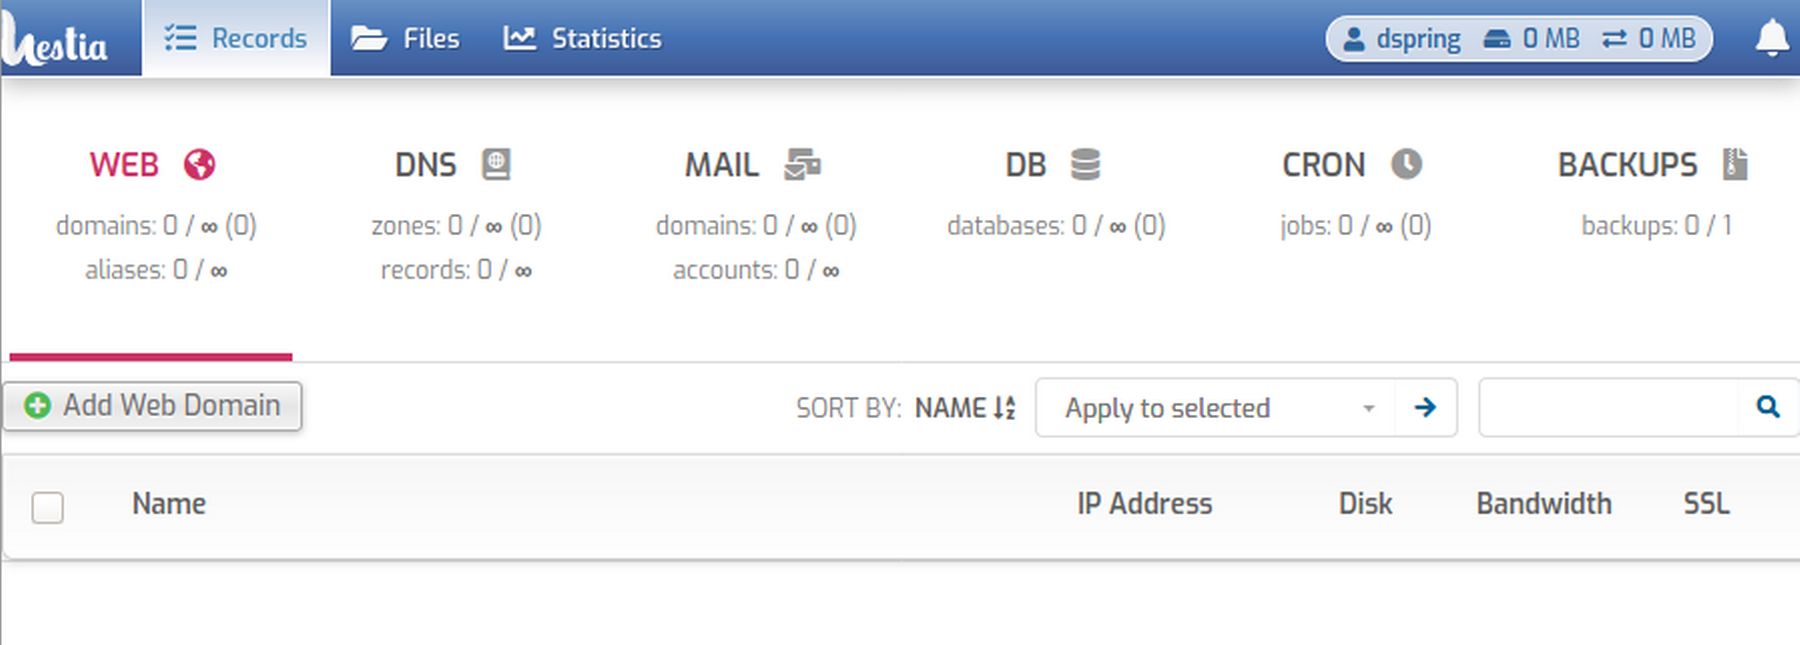
Step 10 Create a Website and SSL Certificate for our Domain Name
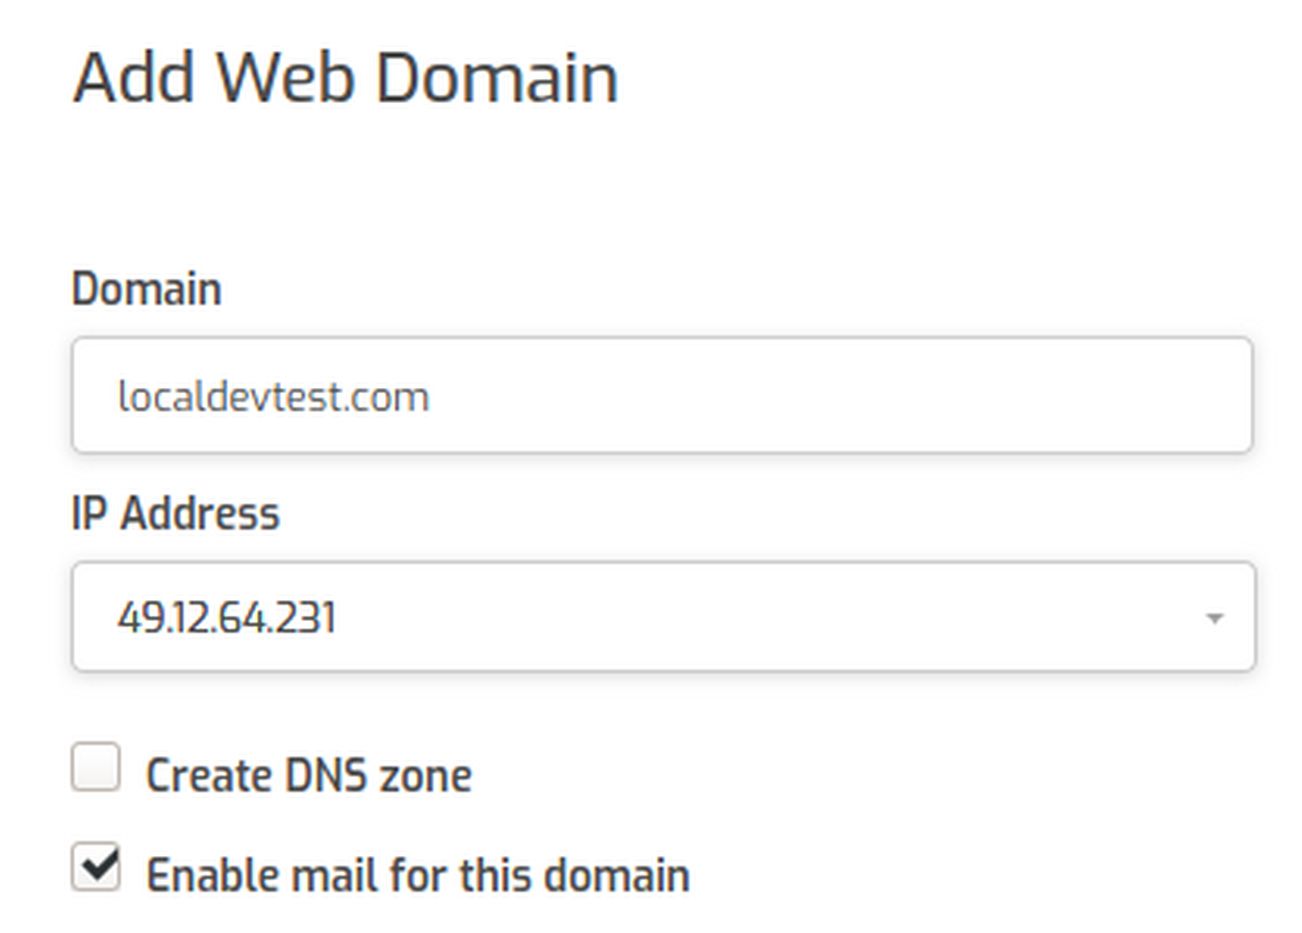
The Hestia user control panel has a lot fewer settings than the admin control panel. Click Add Web Domain. Do not check Create DNS Zone has we already did this on our domain registrar. But do check Enable mail for this domain.
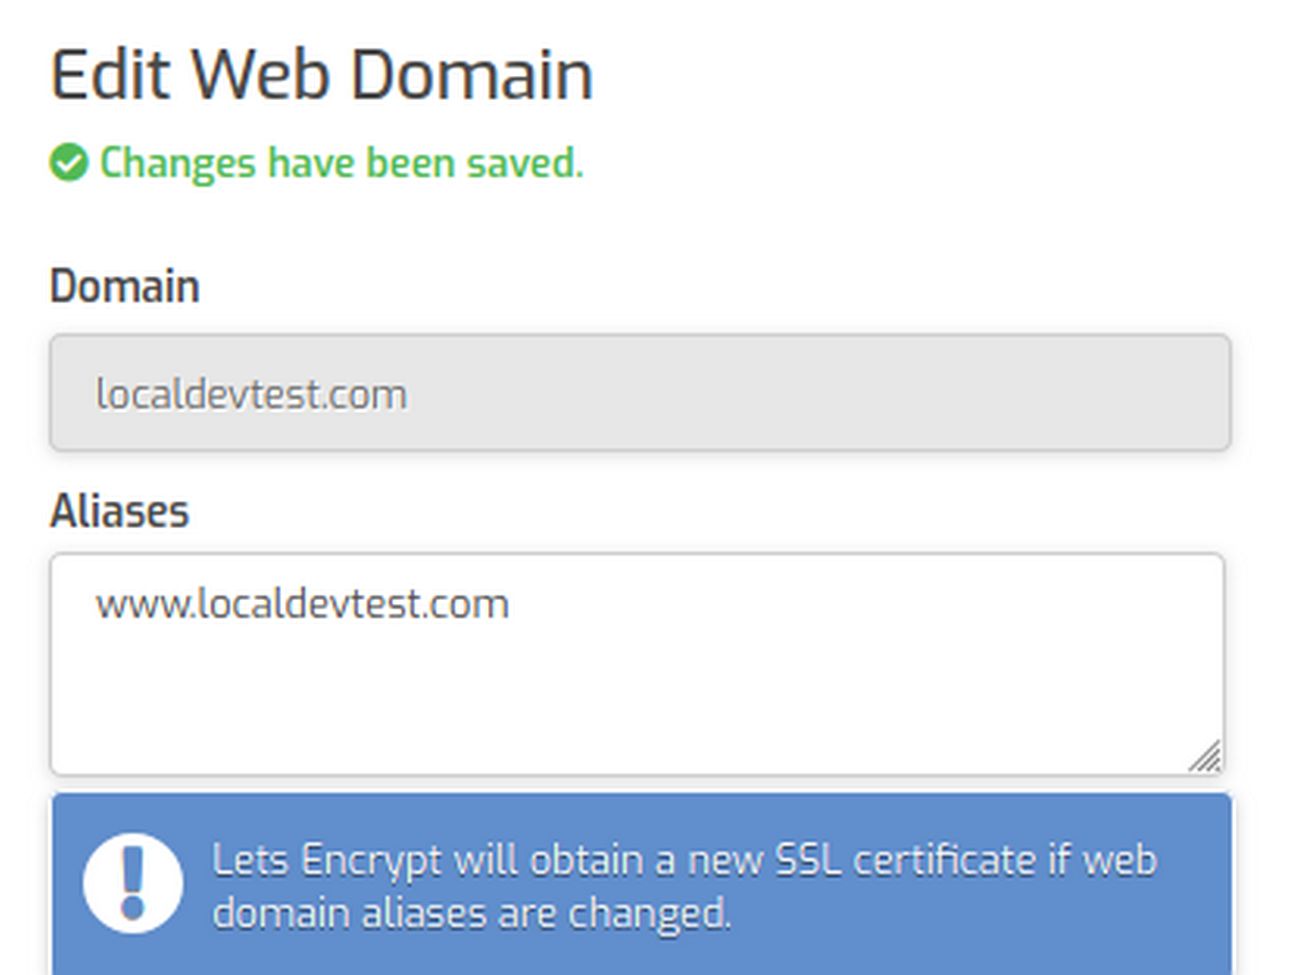
Then click Save and Back. Then select the domain name to edit it.
Check Enable SSL for this domain. Some hidden boxes will appear. Click Use Lets Encrypt to obtain SSL certificate.
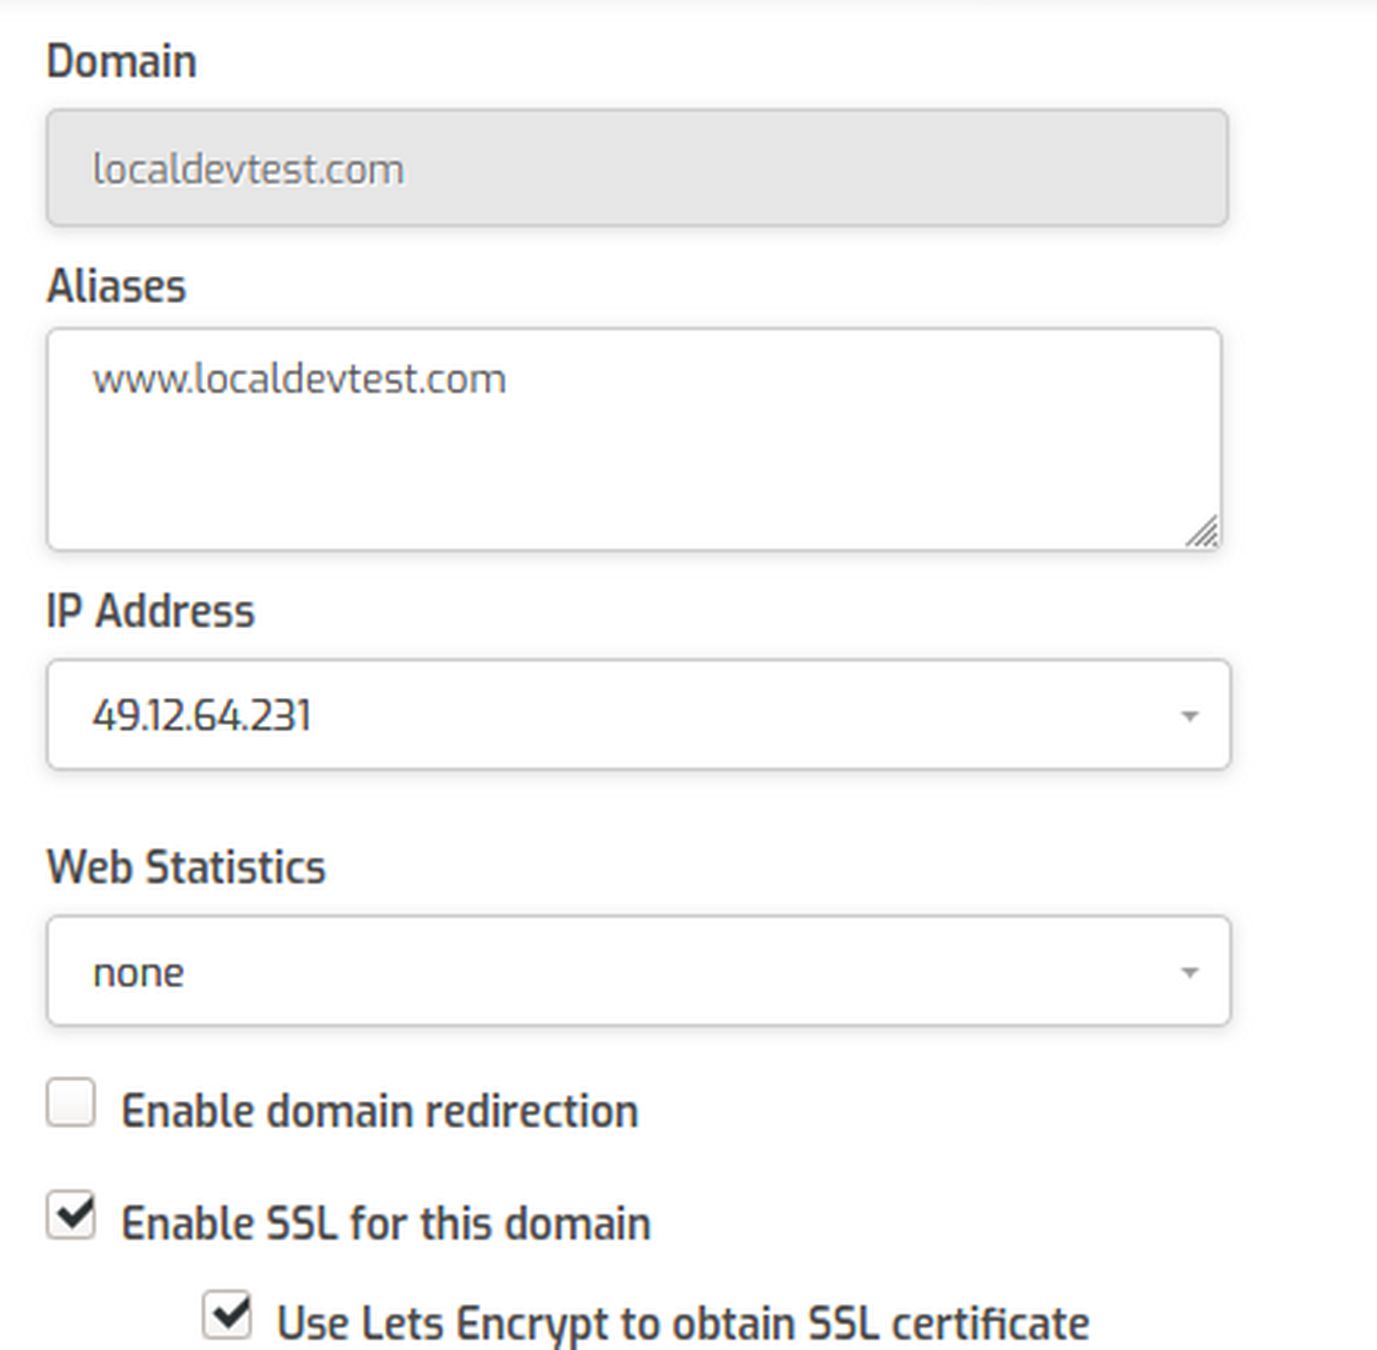
Then click Save. It will take a minute to obtain the certificate:
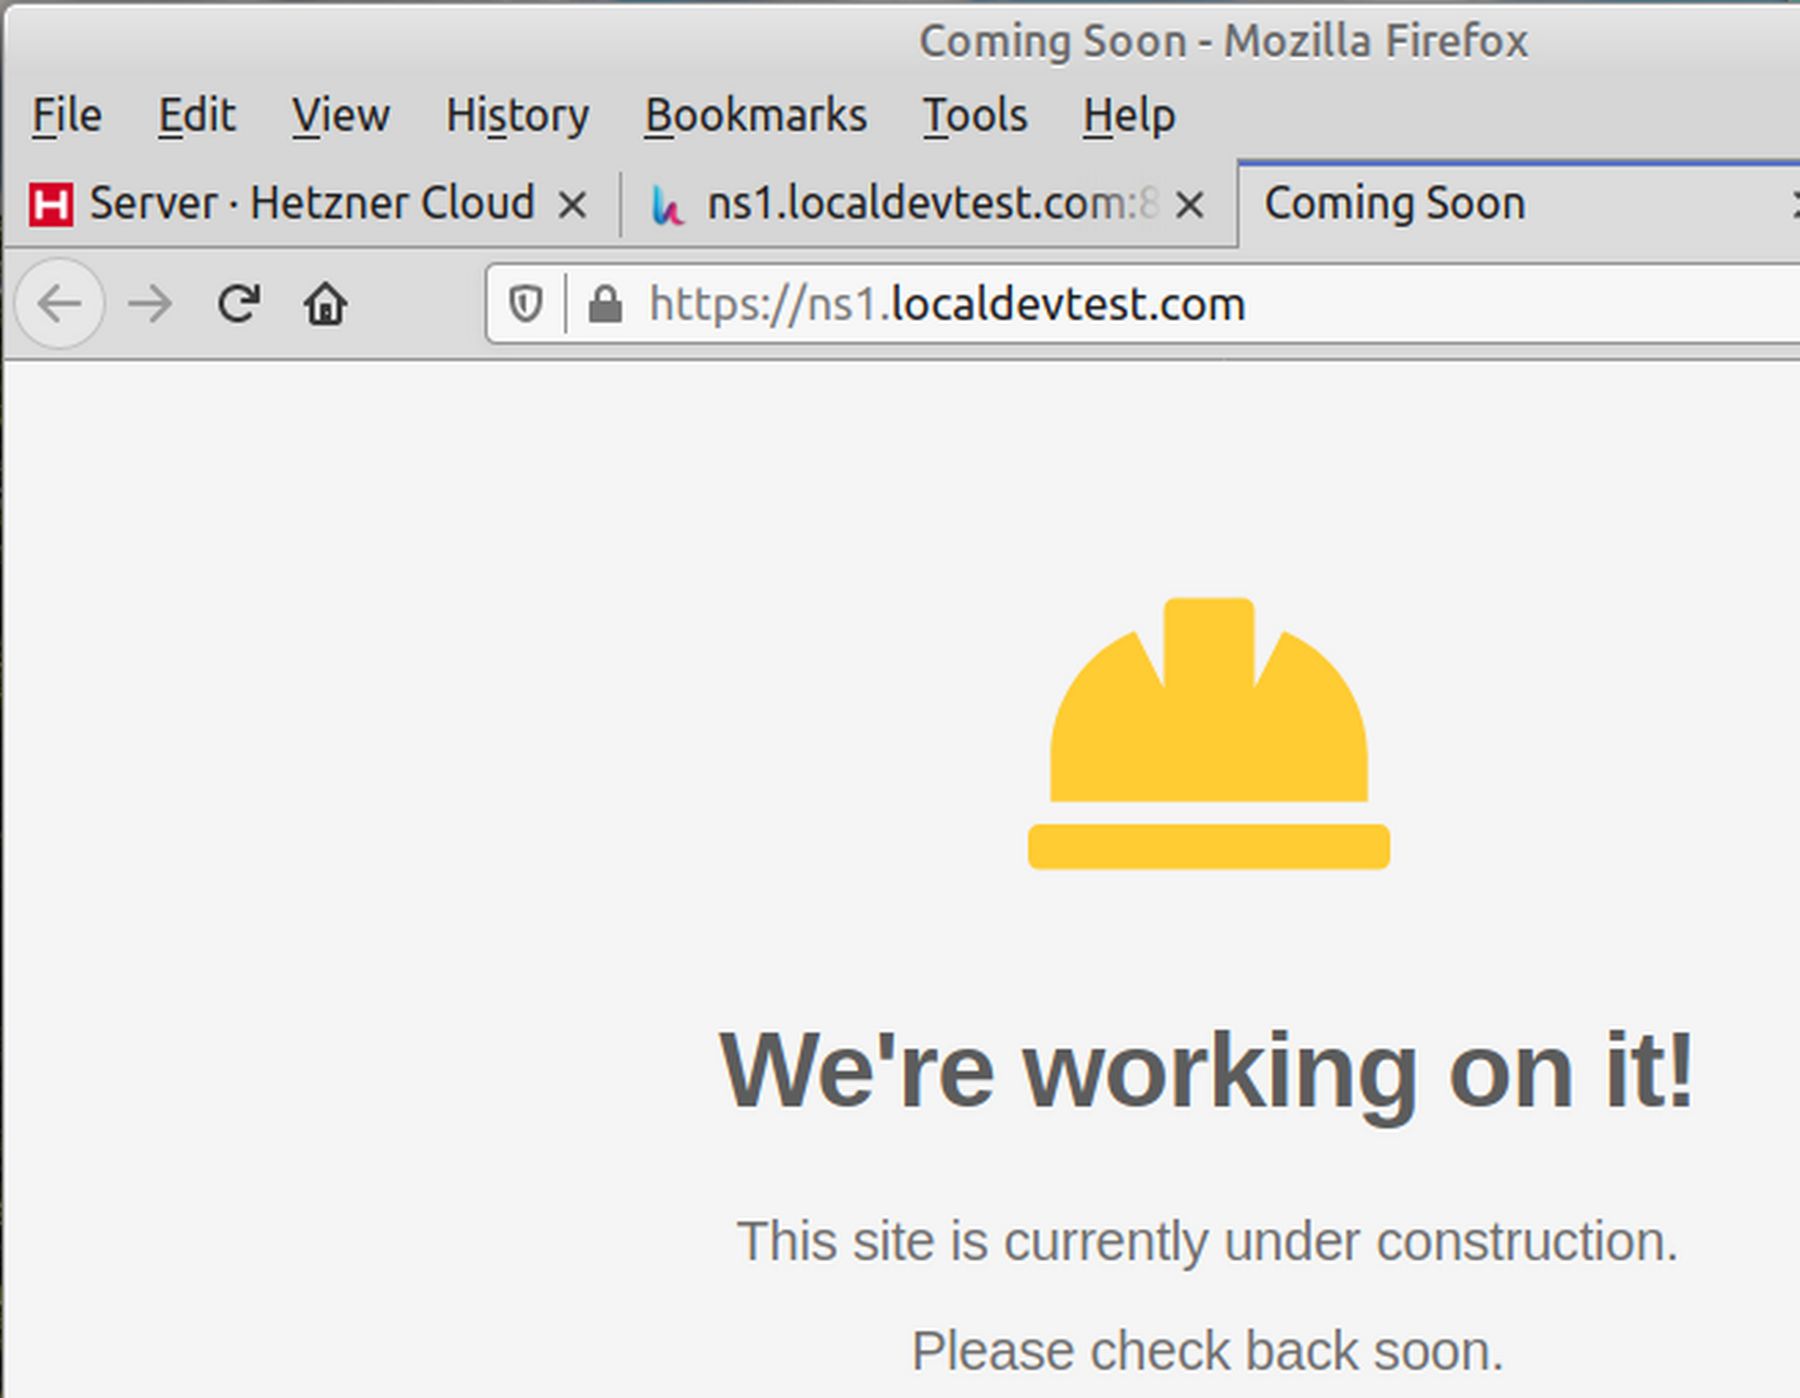
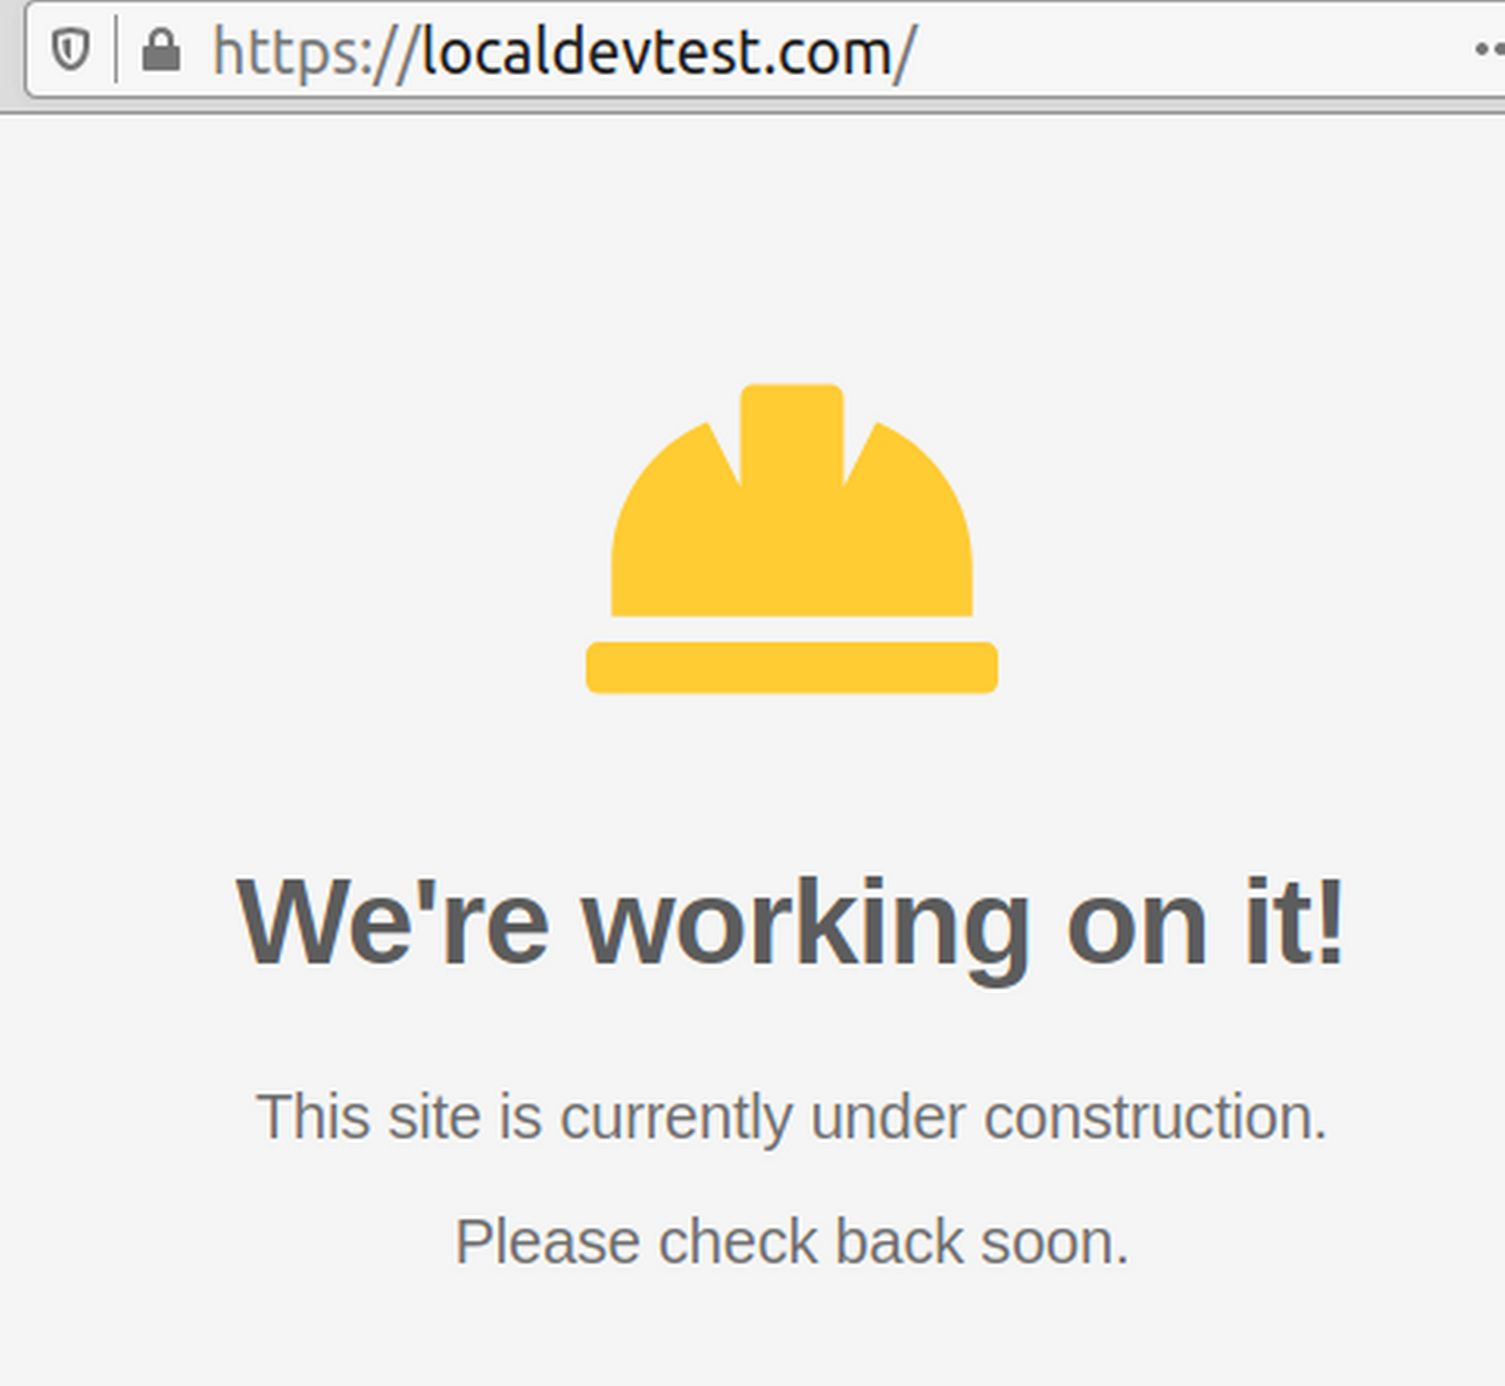
Then click Back. Then select the domain name and click on the up arrow to go to the actual web page.
localdevtest.com
Click continue
Wait 12 hours and try again. ip 49.12.64.231
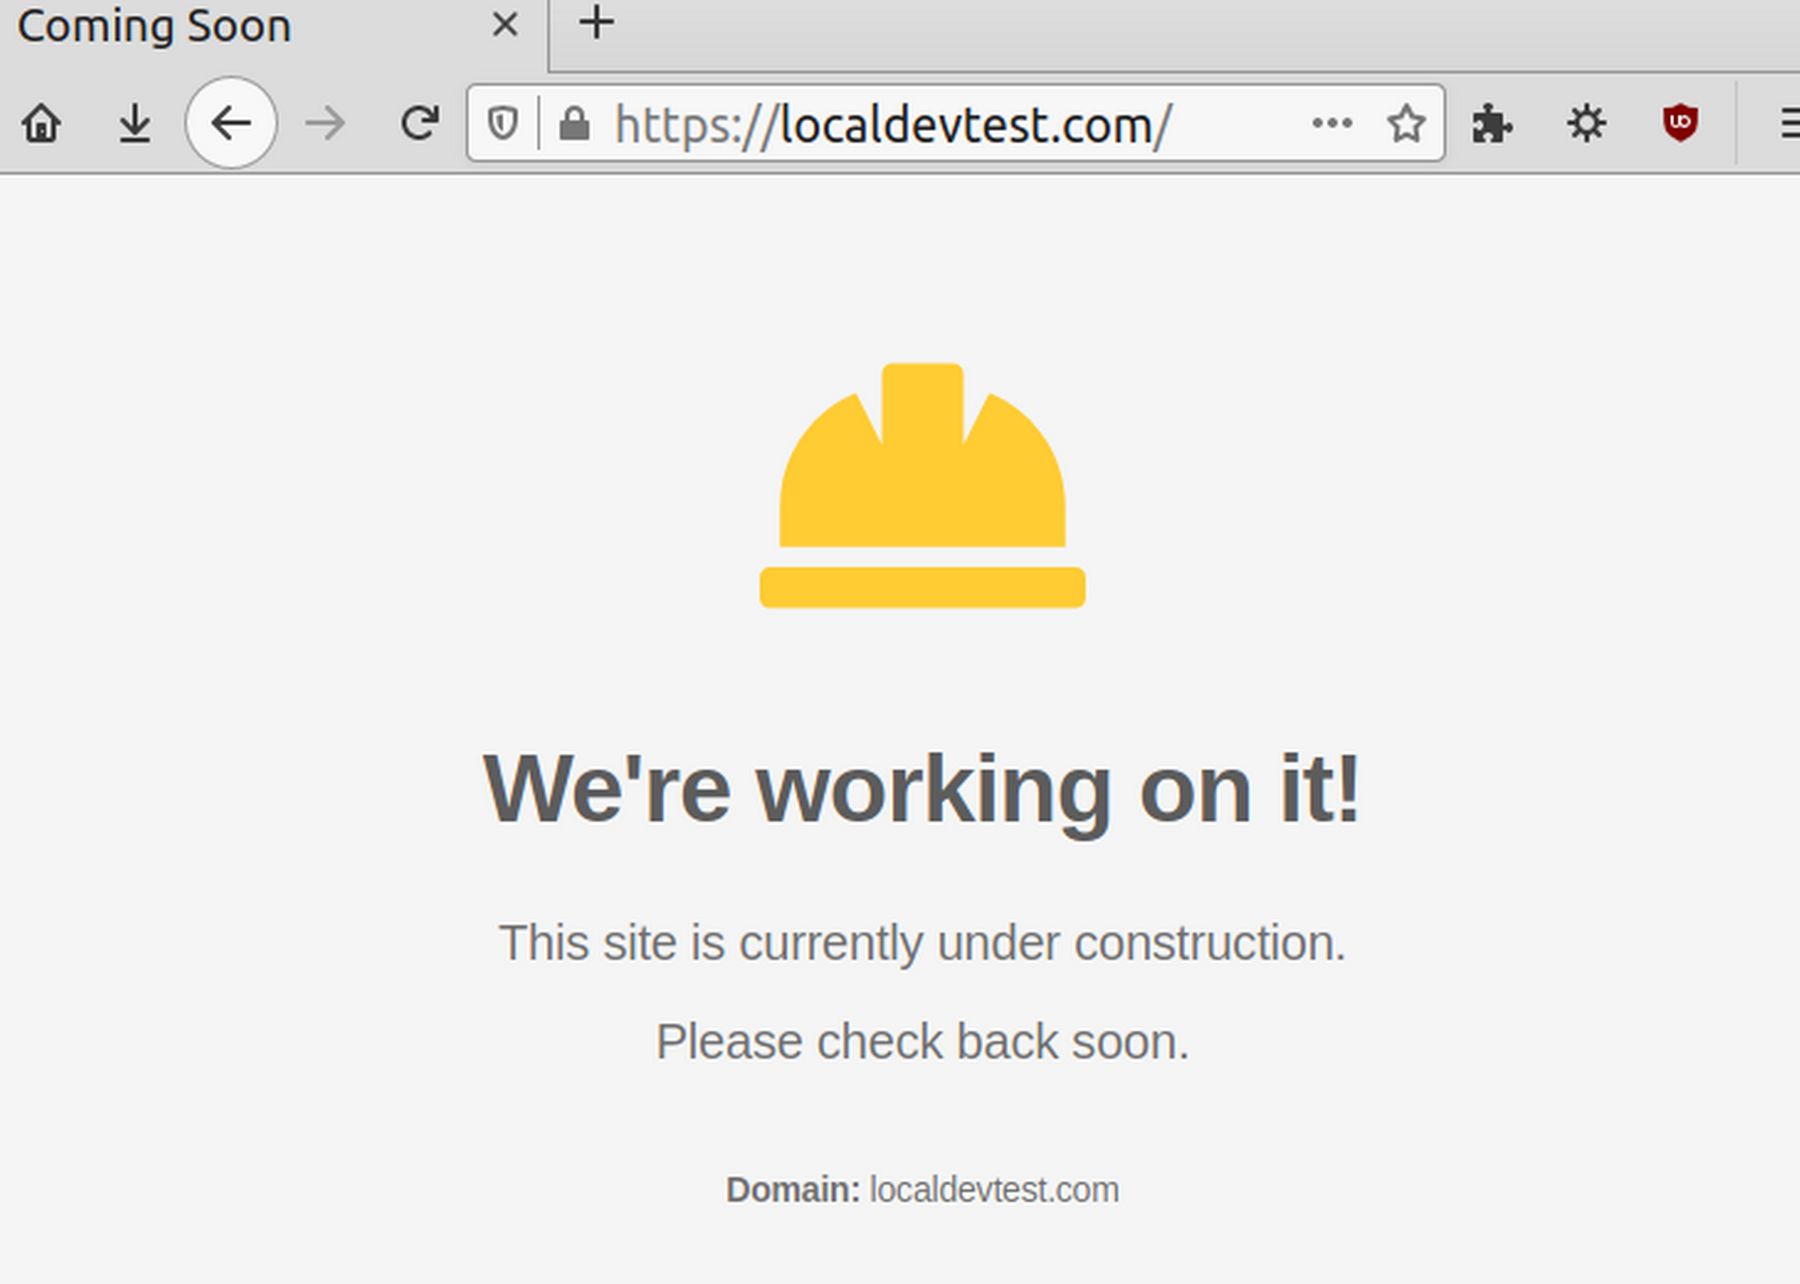
We now have an SSL certificate for our main website. From here, we can install Joomla and set Joomla so that everything on the website including images use HTTPS.
Reduce Hestia RAM Usage
There are two benefits to reducing your Control Panel file size and RAM. The first and most obvious benefit is that it leaves more disc space and RAM for your business website and business email applications. A second less obvious benefit is that it increases your VPS security by reducing the attack surface available to hackers. There are fewer places for hackers to hide. On the Internet, smaller is almost always better.
Hestia is one of the smallest, fastest and lightest Control Panels in existence. Compared to Cpanel and WHM, Hestia is a much smaller file size and uses less RAM – in much the same way that the Linux operating system is much smaller and faster and uses much less RAM than the Windows operating system. However, we can make Hestia even faster and use even less RAM by taking one simple step. In this article, we will review how to do a custom install of Hestia by removing an unneeded Anti-Virus Program called ClamAV.
What is ClamAV and why is it not really needed?
ClamAV is an email antivirus program that scans emails and email attachments looking for hidden malware. Those coming from a Windows background wrongly assume that an antivirus program is essential. This assumption is true if you are working with an insecure Windows operating system and insecure MS Office files – as both have open back doors. Antivirus programs helps recognize MS Office documents and other email attachments that have been hacked.
However, an antivirus program is generally not needed for the Linux operating system and Libre Write documents because both are built much more securely. The solution to the hacking problem is not adding an antivirus program to Windows. There is no such thing as security if you are using Windows and MS programs. Hackers will eventually take over your system regardless of the antivirus program you are using. Instead, real security only comes from using the Linux operating system and more secure applications like Libre Office. Since we will only be using Linux and Libre Office for our business website and email functions, there is no real need for ClamAV.
What is the file size and RAM usage of ClamAV?
ClamAV has to grow bigger all the time because it has to respond to more Windows based hacker attacks all the time. ClamAV also has more than one component. To download the latest version of ClamAV go to: https://www.clamav.net/downloads
It claims the file size is 12.8 MB. Download and uncompress the file. Then right click and click Properties. The real file size is 50 MB. Adding the plugins and other needed components brings ClamAV up to about 100MB – similar to a basic Joomla website.
What is the RAM usage of ClamAV?
RAM is one of the most limited and most expensive resources on a VPS. To see the RAM usage for our new Hestia server, click on settings for ns1.localdevtest.com:
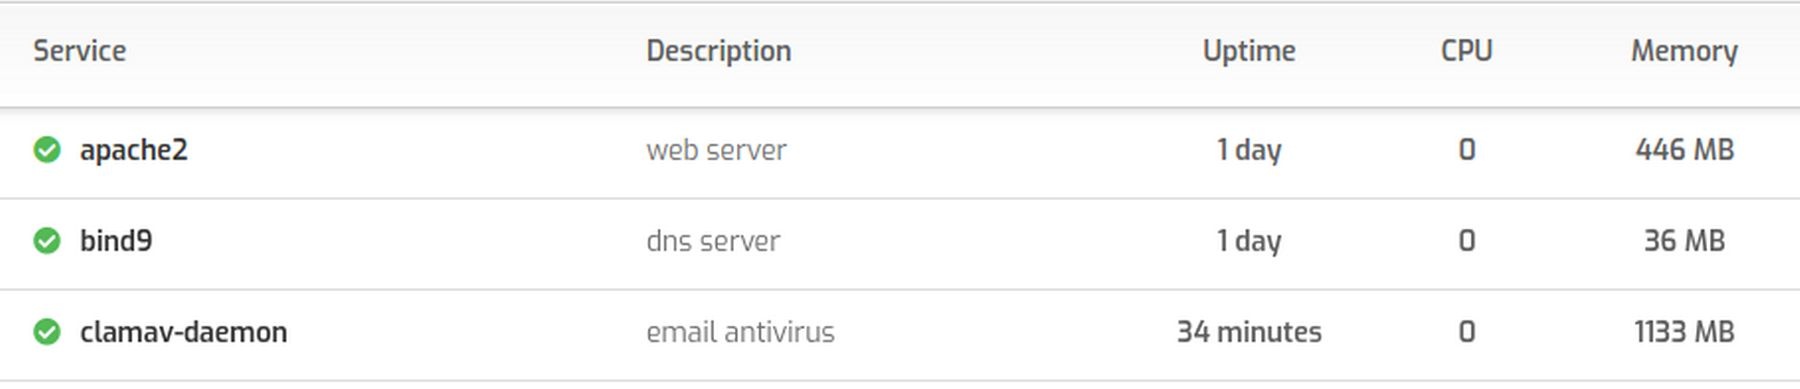
Apache Server and Maria Database each take up 400 MB which is to be expected. However, the real problem is Clam AV which is using 1133 MB of RAM!. ClamAV also takes up about 50% of our CPU on our VPS.
The question is why do we even have it? Given that our VPS is a Linux server and even our host computer is Linux and we are using spam assassin and a firewall, ClamAV is simply not needed.
However, deleting Clamav from an existing Hestia VPS is not a good option. Instead, the leaders of Hestia recommend to delete ClamAV before installing Hestia. We will therefore create a new server and then use the Hestia Installation command to eliminate ClamAV from being installed in the first place.
What is the File Size of Hestia?
You can download the Hestia Zip File from this link: https://github.com/hestiacp/hestiacp/
The uncompressed file size of Hestia is only 12 MB. This obvious does not include the file size of the Apache server, Nginx, Maria DB, PHP and several other programs installed with the Control Panel. However, it does confirm that Hestia is a very lightweight program. Open the Hestia folder and you will also see that Hestia is very well organized. The appearance of Hestia, which we will review in a later chapter, is in a folder located at web/css/themes. There are currently four themes and we will try to add a fifth theme. We will also change the index.html file which is located in deb/templates/web/skel/public_html.
Commands to do a custom install of Hestia without ClamAV
The first command is the same as a normal install:
wget https://raw.githubusercontent.com/hestiacp/hestiacp/release/install/hst-install.sh
The second command uses a slightly different bash script:
bash hst-install-debian.sh --clamav no
The second command is the normal install script followed by a single space followed by two dashes followed by clamav and another space and then the word no. Then press Enter. This screen will appear:
Answer the first questions by typing Y. Then Enter. Then type your real email address and and FQDN. Then press Enter. Then wait 10 minutes for the installation to complete. Remember to copy the log in URL and password before restarting Hestia.
Admin URL: https://ns1.localdevtest.com:8083
Username: admin
Password: SvbFvA7o33tKV1GH
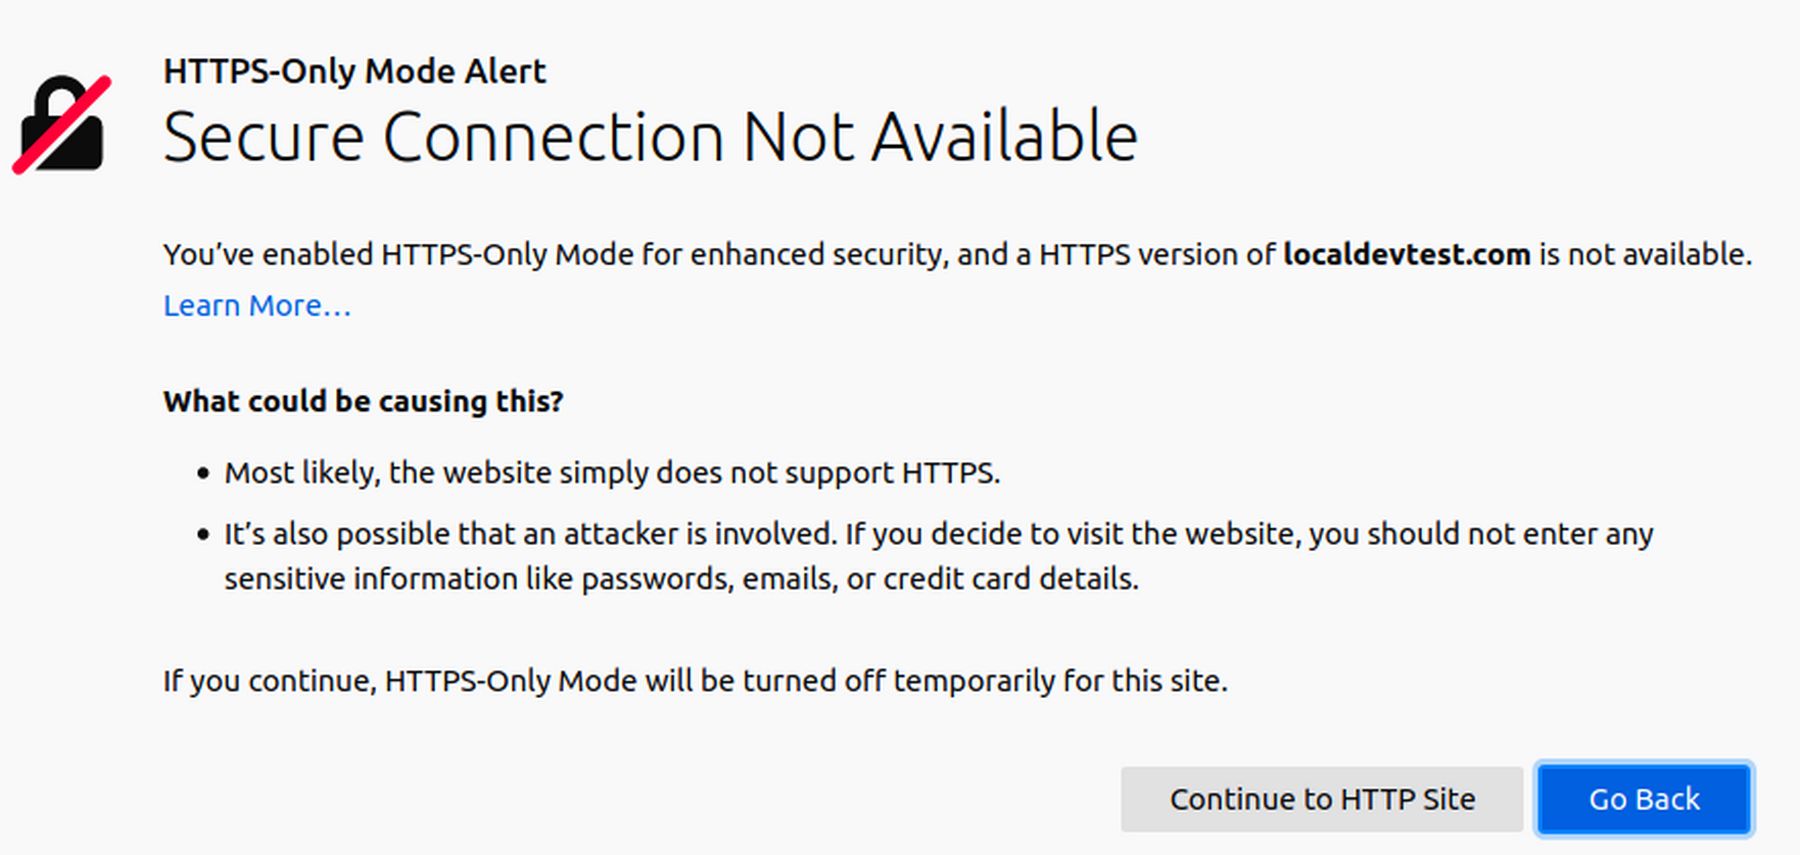
When you log in using Firefox, you may encounter this warning:
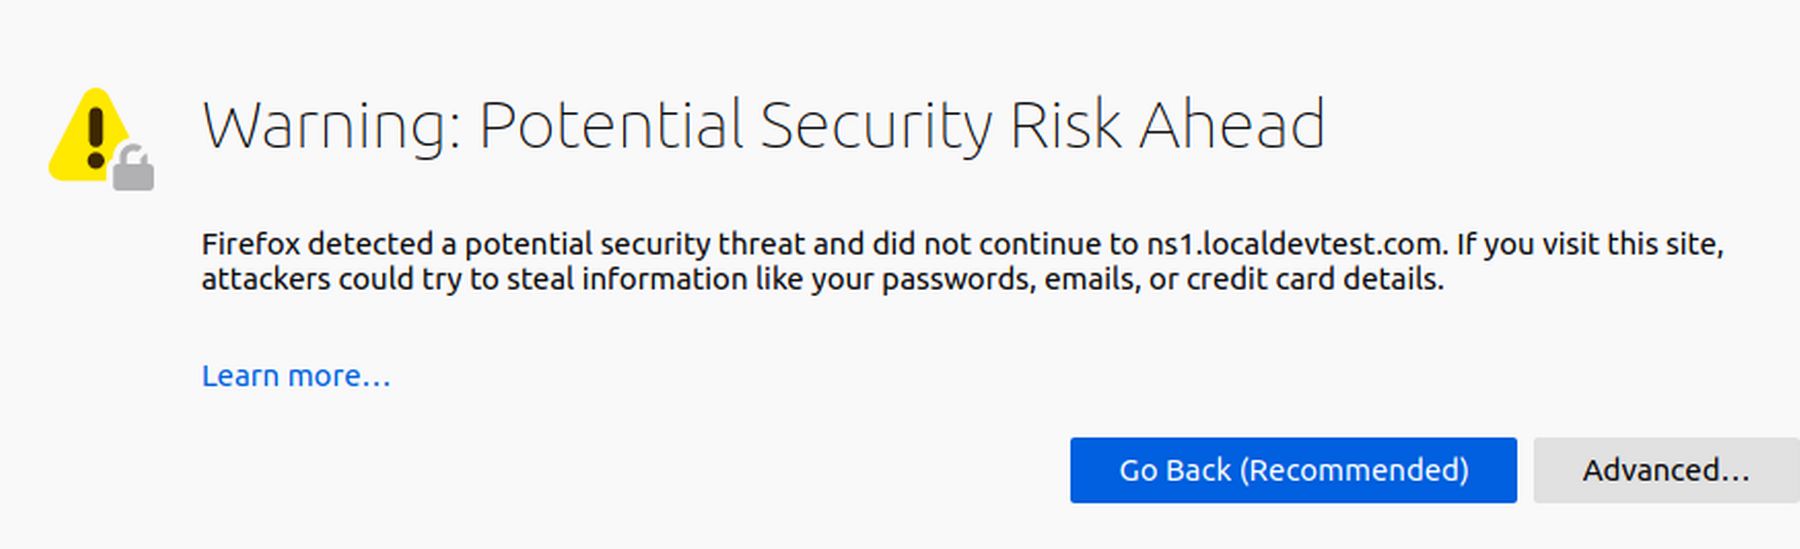
This time, the certificate is a self signed rather than being Lets Encrypt. This could be due to Lets Encrypt certificate having been previously installed on the same IP with our previous server. We can fix this later. Log into Hestia and click Settings:
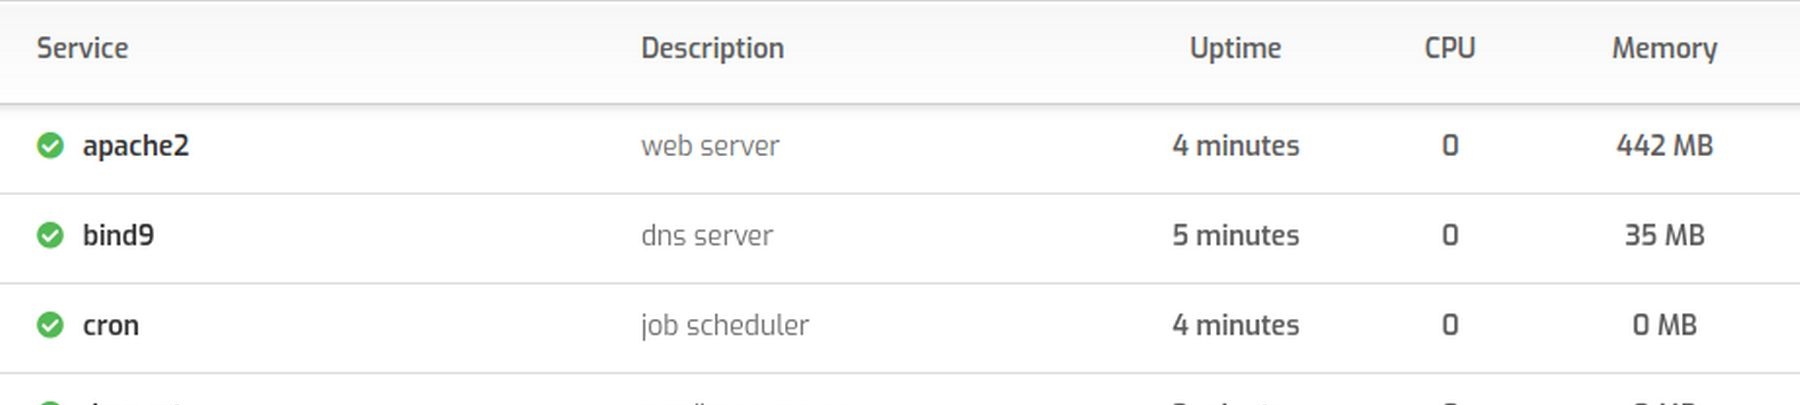
ClamAV is gone and RAM or memory usage has been cut from 2 GB to 1 GB. Finish building your new Hestia VPS. Initial steps include changing the theme from dark to default, changing the admin password, and creating a new user. Then log into the new User panel and create a website for your domain name. Then add a Lets Encrypt Certificate. If you get this secure SSL screen, your website is ready:
What's Next?
In the next article, we will review some additional steps you can take to improve your website security.