
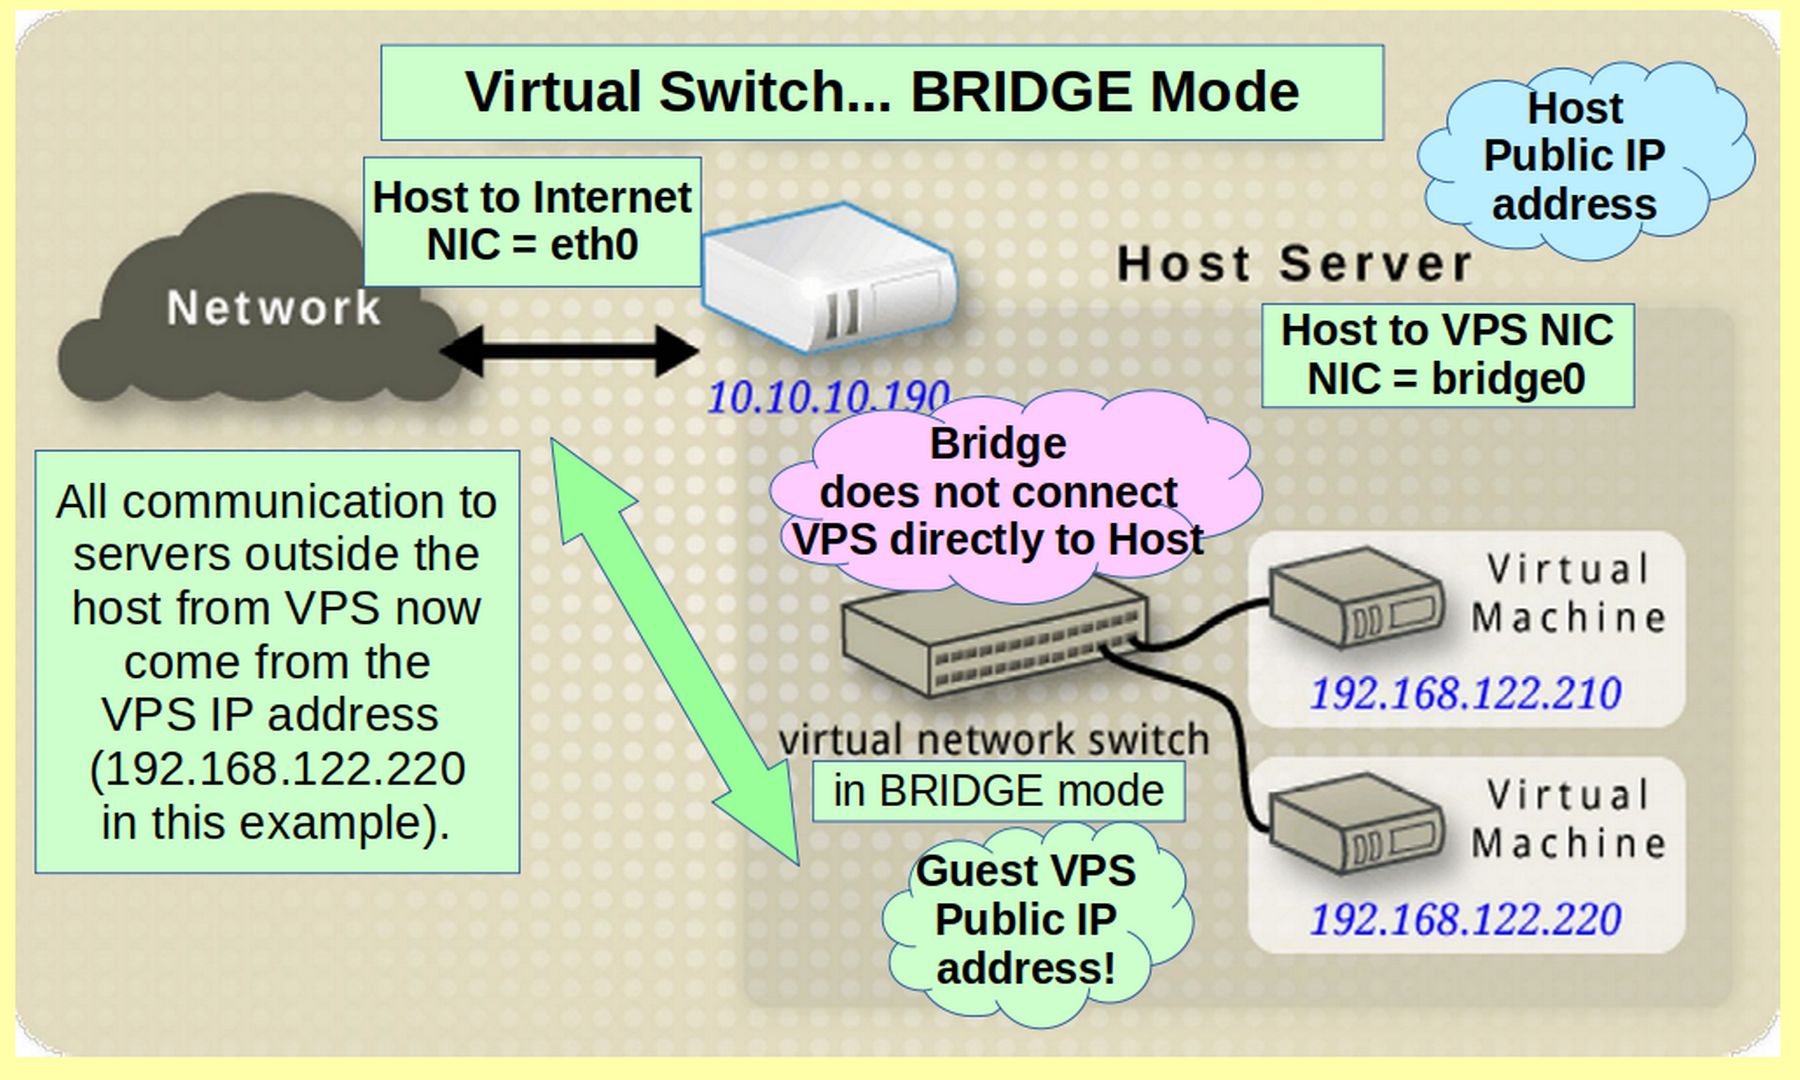
A bridge connection is a way to enable our virtual private server to bypass our host computer and connect to the public internet using its own static IP address rather than the IP address of our host computer. Giving each VPS its own static IP address that goes directly to the Internet is an essential step before we can add a Hestia Control Panel to each VPS. In this article, we will explain how to create a bridge network interface using a Linux tool called Network Manager. As a reminder, here is what a Bridge connection looks like:
What is Network Manager and Why We Recommend It
Setting up a sandbox virtual private server has numerous challenges that can be very confusing for beginners. The first challenge we are faced with is that the default network, called NAT will not allow us to install Hestia because NAT hides our VPS behind our host computer IP address. We therefore need to learn how to create a bridge network (which we will do in this article). But the challenges do not end there. In the next article, we will learn how to use DNS which is also required to install Hestia onto our VPS.
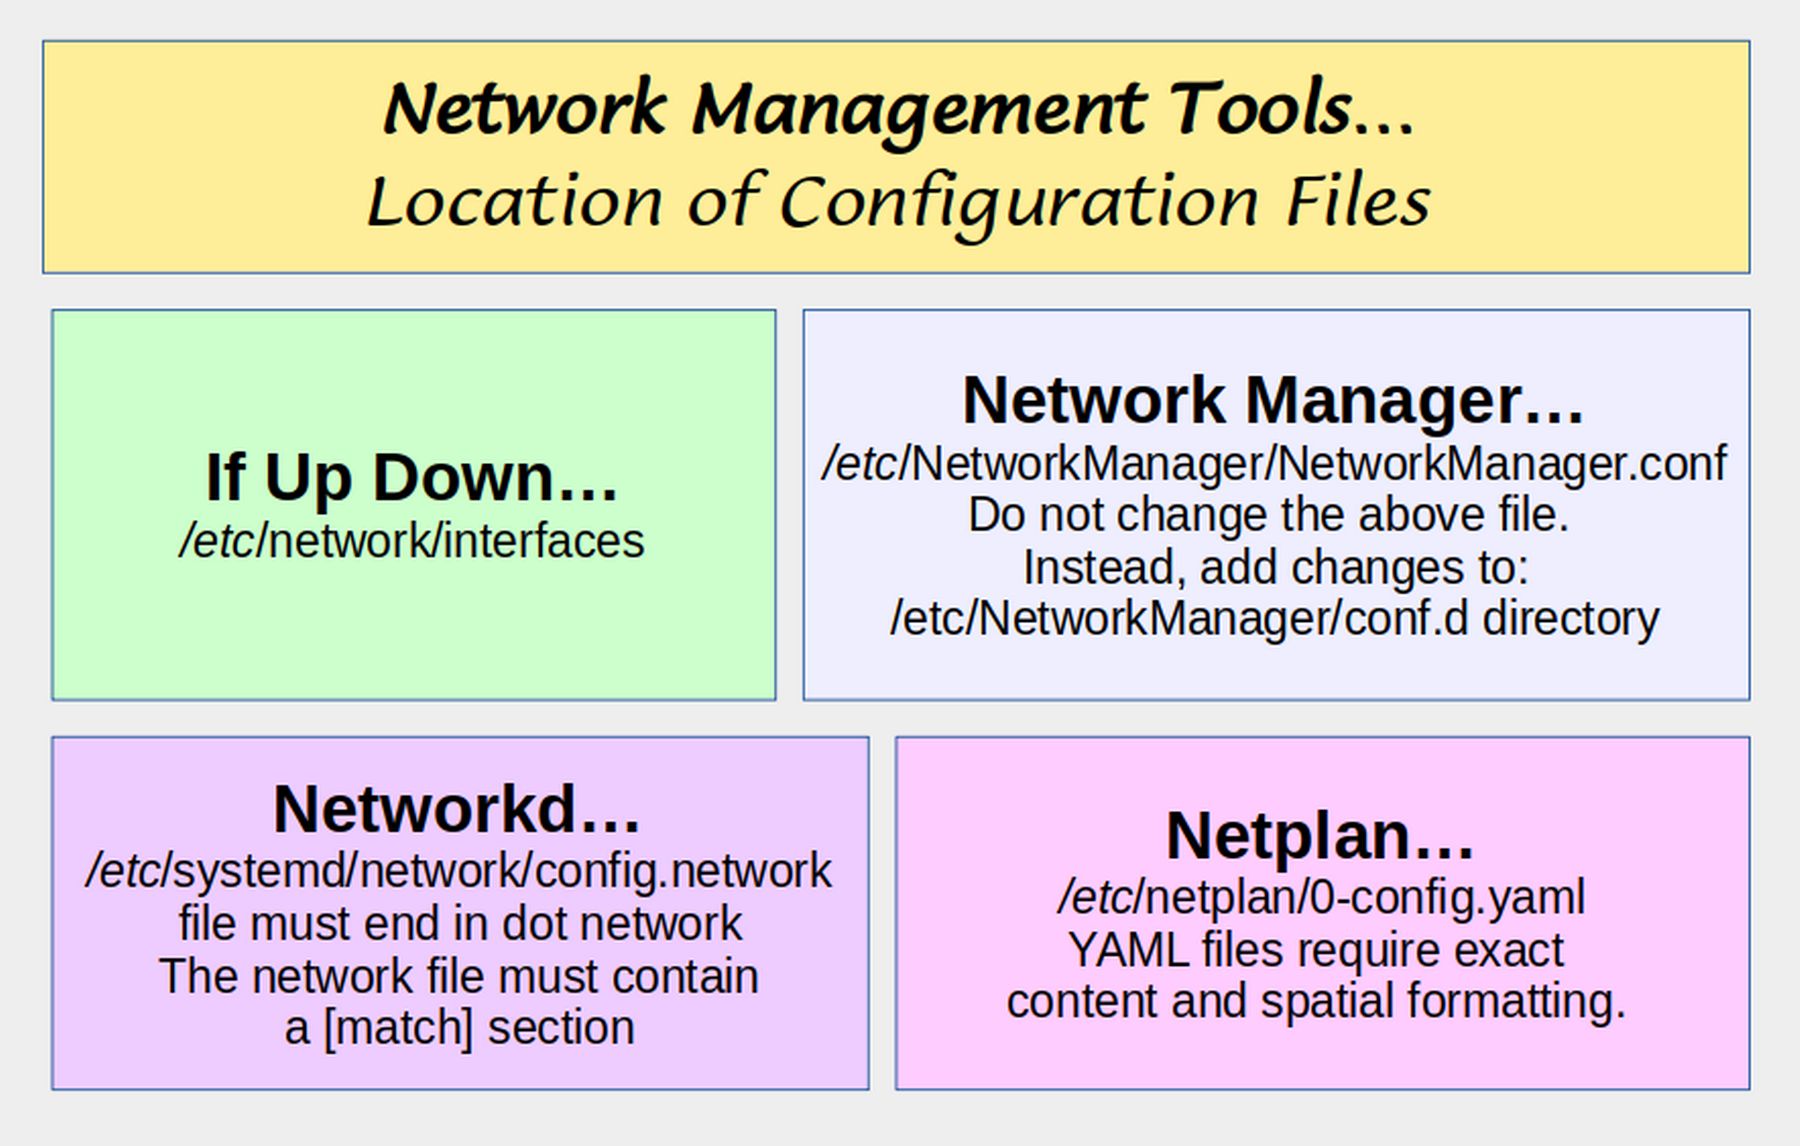
Another challenge is that there are several different Linux Network Management tools in common use today. Here is a brief description of each.
#1 The Original Linux Network Manager – Ifupdown
The original tool has the terrible name “Ifupdown.” We have to learn to deal with this tool because it is the only tool that comes installed and active by default on our Debian 11 Virtual Private Servers. Ifupdown has very limited functions but is compatible with all of the other more modern network managers.
#2 Network Manager
This Linux tool was created in 2004 to add more functions to Ifupdown. The name Network Manager is very confusing because when one hears the term Network Manager, you have no idea if the term refers to the general concept of a network manager or if the term is being used to refer to the specific program called Network Manager. The benefit of Network Manager over the other two modern options is that Network Manager comes installed and active on Linux Debian Cinnamon Desktop computers and can easily be added to Debian 11 Virtual Servers. Another huge benefit of Network Manager is that it has two graphical interfaces which help beginners better understand how to create and edit network settings.
The first of these Network Manager graphical interface tools is an icon which is on your Debian task bar called Network Connections. Click on the Network icon on the right side of your task bar.

The second graphical tool is called Network Manager Text User Interface or nmtui. Open a terminal and type nmtui.
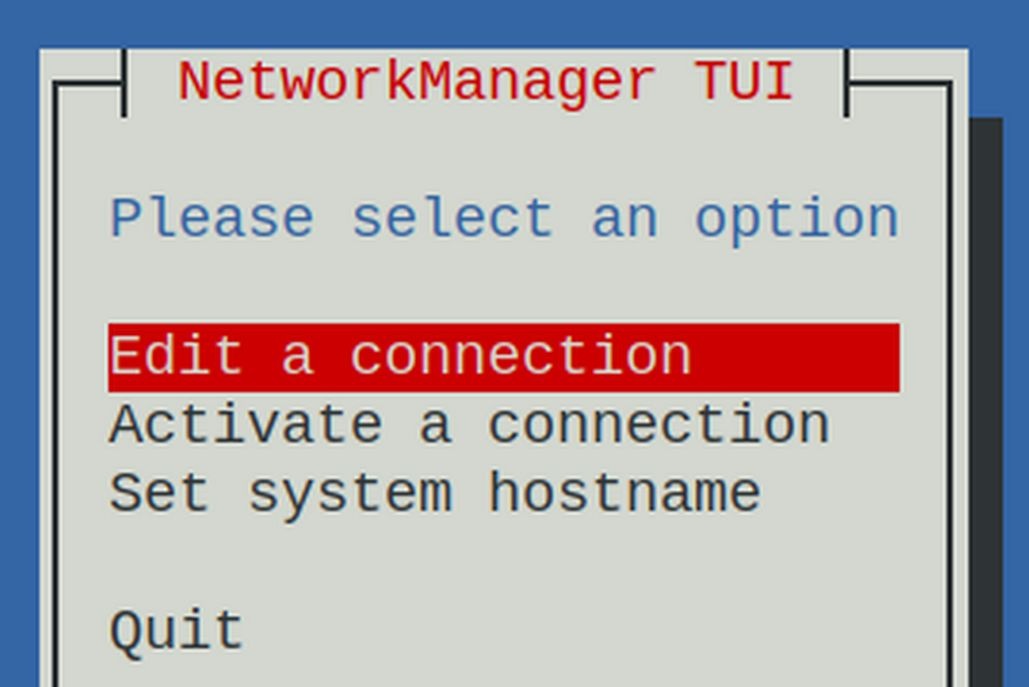
Press the up or down arrow to change selections. Press Enter to choose a selection. Press Escape to go back to the previous screen. Because nmtui works in a terminal window, nmtui works with either Debian Cinnamon Desktop or your Debian Virtual Private Servers. This is the tool we will use below to create our first Bridge connection. It is also a tool we will use on our virtual private servers.
Network Manager also comes with a terminal command tool called Network Manager Command Line Interface aka nmcli. The names alone can be challenging for beginners to learn. We will occasionally use nmcli to do tasks that cannot be done by nmtui.
The third network management option is called networkd. Sadly, networkd conflicts with Network Manager. So you can use one but not both. networkd comes installed on both the Debian Cinnamon Desktop and on Debian 11 servers. Thankfully, it is not active on either – and we are not going to activate it because it would conflict with Network Manager. The drawback of networkd is that it only comes in a command line version. There is no graphical interface version. It is therefore difficult for beginners to understand what networkd is doing. Note that by default, the etc/systemd/network folder is empty if networkd has never been activated.
The fourth and final network management option is called Netplan.
As if three choices were not bad enough, in 2017, Ubuntu came out with a new network management tool called Netplan – which uses the truly insane process of setting up a YAML file to control network configurations. Netplan only has a command line version. There is no graphical version. But Netplan is much more difficult to use that Network Manager or networkd because Netplan requires the use of YAML files. YAML files are possibly the most confusing files ever created. This is because YAML files use hidden (non-visible) spaces as part of the command. These hidden spaces must be set in exactly the correct way or the YAML file will not even run. This makes YAML files a nightmare for beginners to learn. Here is an example of a Netplan YAML file:
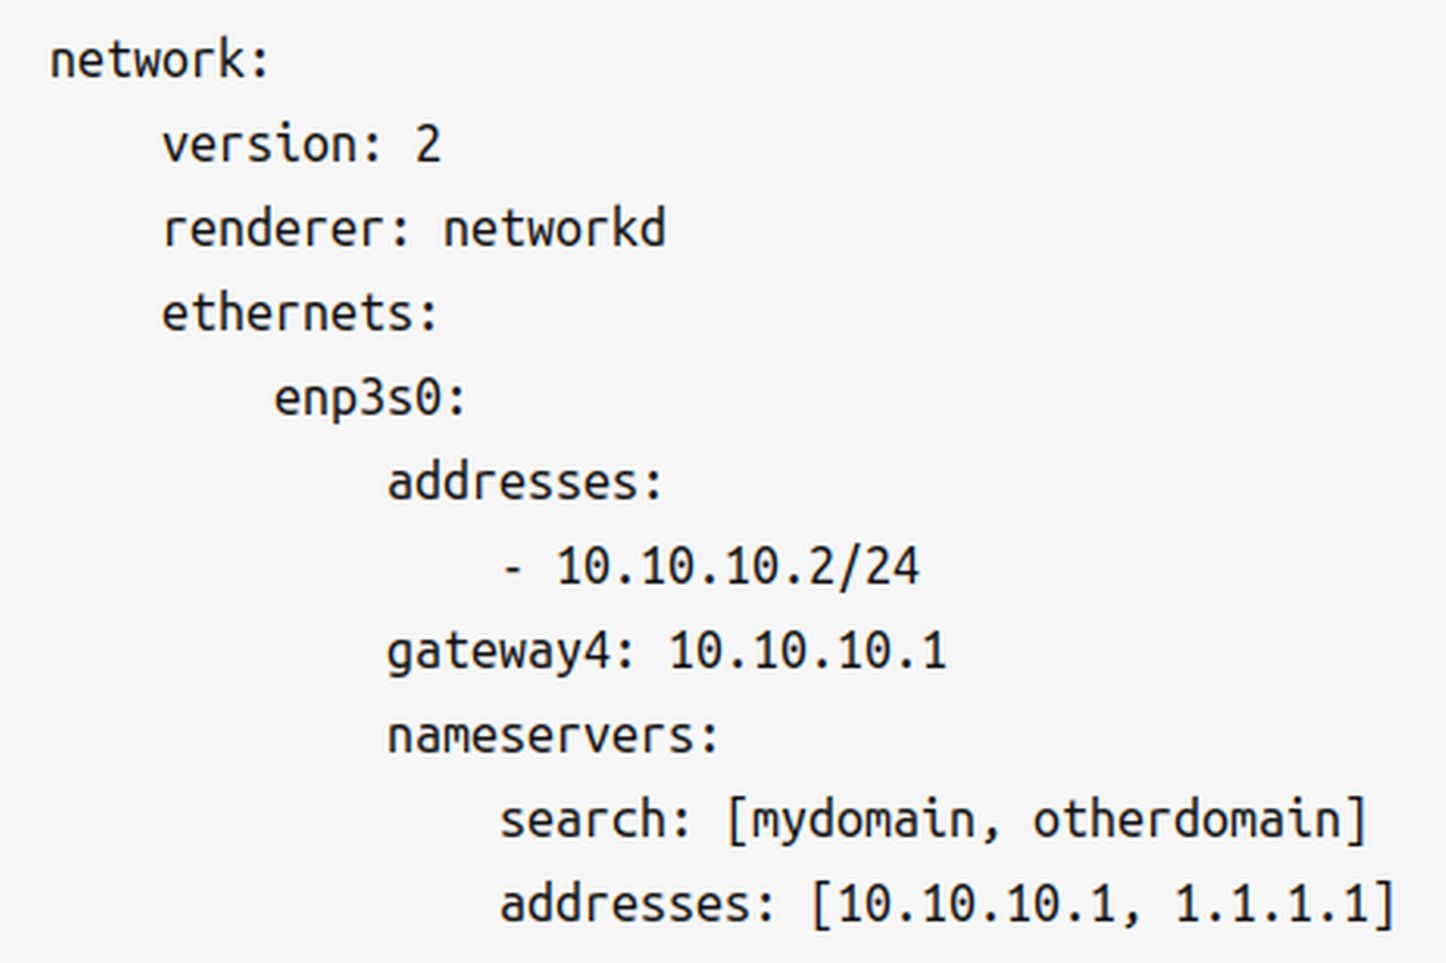
The hidden spaces are to the left of each line. Note that Netplan can use used with either Network Manager or networkd as the renderer (but not both). This means that you still need to learn how to use either Network Manager or networkd in order to use Netplan.
YAML files uses spacial formatting in addition to the conventional text scripting. Spacial formatting means that not on does the text have a special meaning, but so do the indentations and spacing between the words. Get one space or indent out of alignment and the entire YAML file will not run.
The hidden spaces add a level of abstraction that make Netplan the most difficult of the four Linux network management options.
But the most confusing problem for beginners is that each of these four radically different network management tools has its own group of proponents in the Linux community. Each of these groups has created their own Networking tutorials explaining how to use their favorite network management tool. Rarely do any of these hundreds of tutorials even mention that their tutorial only works with their chosen networking tool – nor do they mention that once you start using networkd, you need to turn off Network Manager – or once you decide to use Network Manager, you need to not use networkd.
This crazy situation of 4 different network management tools has led to a massive amount of confusion.

To make matters worse, the four different network management tools, have vastly different configuration files each with their own set of rules and locations:
Here is what the default If Up Down configuration file looks like:
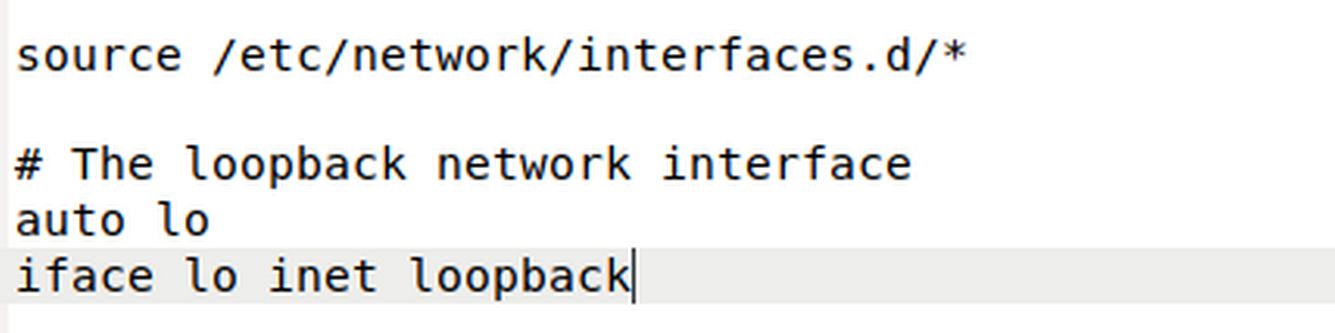
It includes files from the interfaces.d folder. But there is nothing in the interfaces.d folder and therefore nothing in the etc/network/interfaces file. Here is the Network Manager configuration file:

Managed false means that Network Manager is not using If Up Down.
As for the systemd configuration file, go to the etc/systemd/network folder. You will see that there is not even a blank configuration file there.
Finally, in Debian 11, there is no etc/Netplan folder! Hopefully, some day, sanity will be restored to the Networking process and YAML files will be thrown into the dust bin of history.
More reasons to use Network Manager for both Home Desktop and Virtual Servers
My home computer uses Network Manager exclusively. The bridge0 connection we are about to make will also be made with the Network Manager graphical interface. To avoid confusion and conflicts, we will also use Network Manager on our Debian 11 virtual servers.
Create a Second Ethernet Device
The biggest problem with creating a Bridge Connection is that it needs an Ethernet port. If you only have one Ethernet device, when you create a bridge connection, it will take your Ethernet Port and if you were using that Ethernet port to access the Internet, you will no longer have access to the Internet via your Ethernet port (you can still just unplug the Ethernet cable and use WIFI – but it will not be as fast or as secure).
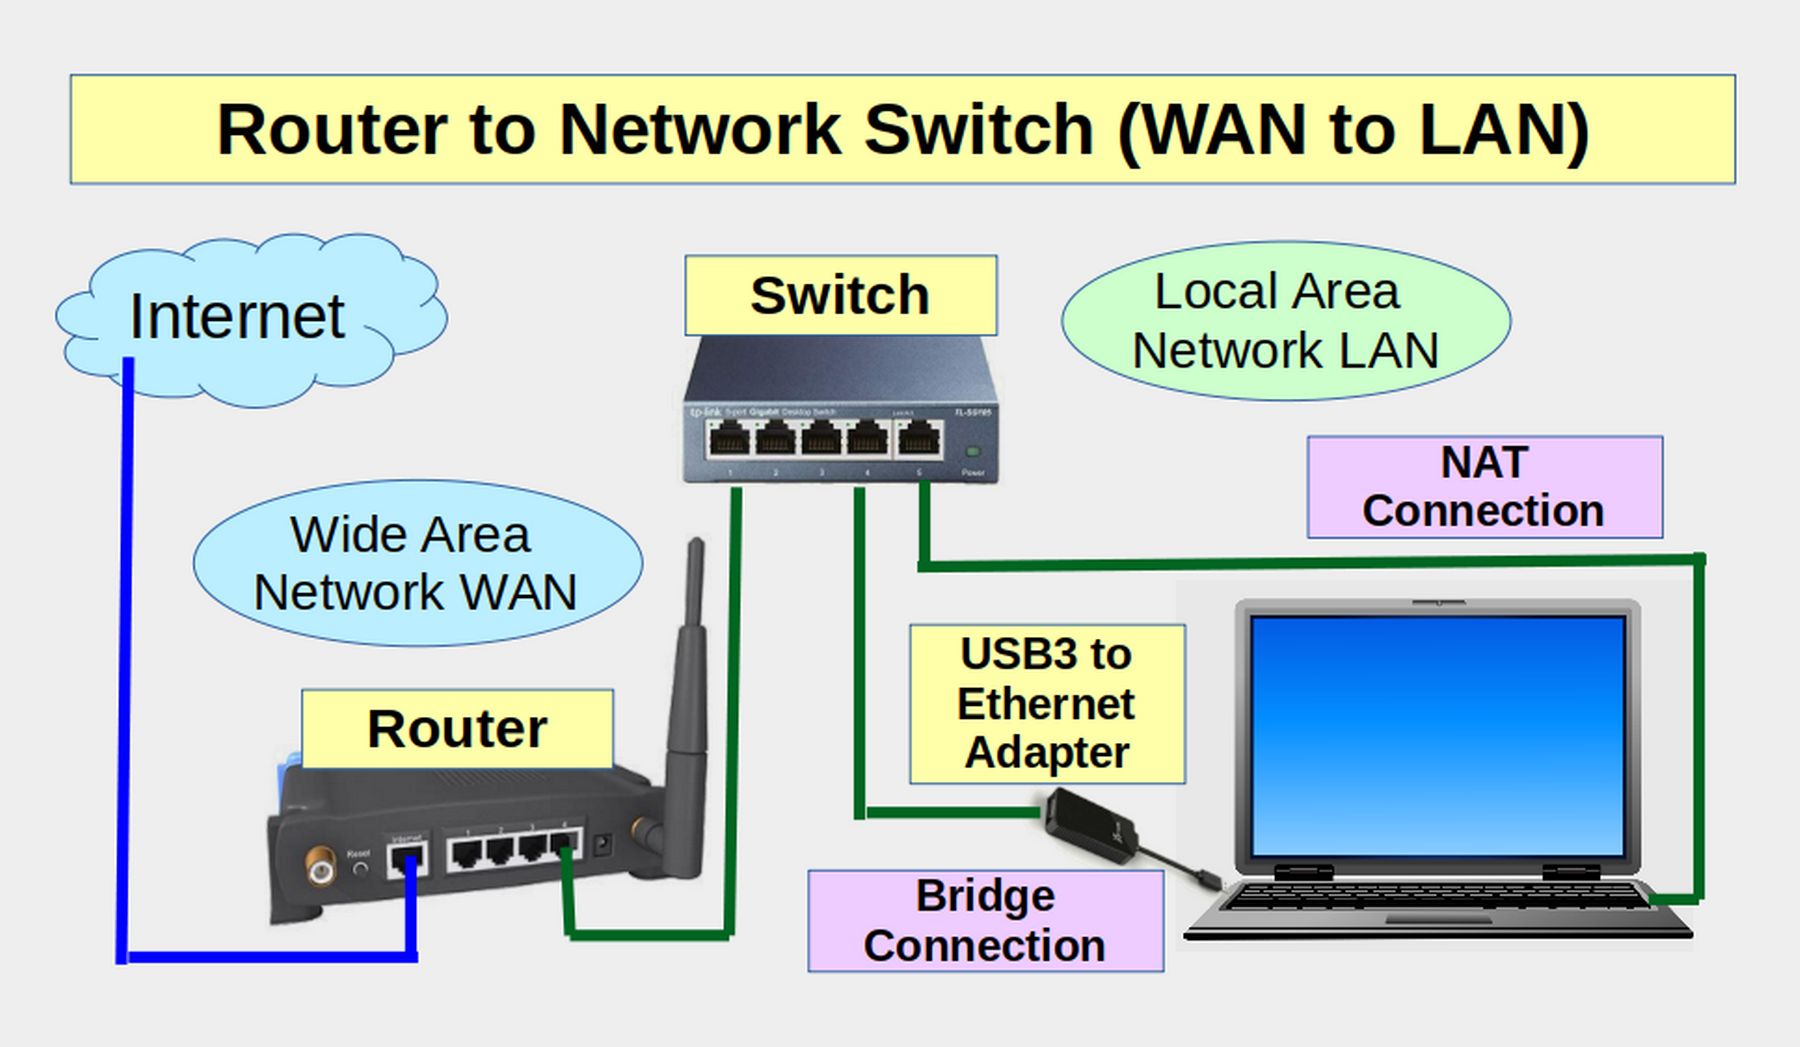
The solution to this problem is to create a second Ethernet device on a second Ethernet port. One way to create this second Ethernet device is to buy a USB3 to Gigabyte Ethernet Adapter.
Hardware Needed for Second Ethernet Connection
A bridge connection will capture your normal Ethernet connection on your laptop unless you create a second Ethernet connection on your laptop. The easiest way to create the second Ethernet connection is to convert one of the existing USB3 ports on your laptop into an Ethernet port. This is done by buying a USB3 to Ethernet adapter and plugging the USB3 end of the adapter into your computer Ethernet port. Here is a link to a J5Create USB3 to Ethernet port sold at Best Buy for $20
https://www.bestbuy.com/site/j5create-usb-3-0-to-gigabit-ethernet-adapter-gray/2001047.p?skuId=2001047

You will then need an Ethernet Network Switch to connect a separate Ethernet cable to. This switch should be a Plug and Play switch. Here is a link to a TP-Link 5 port switch on Amazon for $14
https://www.amazon.com/gp/product/B00A128S24/ref=ask_ql_qh_dp_hza
TP-Link TL-SG105 5 Port Gigabit Unmanaged Plug and Play Ethernet Network Switch $14 Model TL-SG105
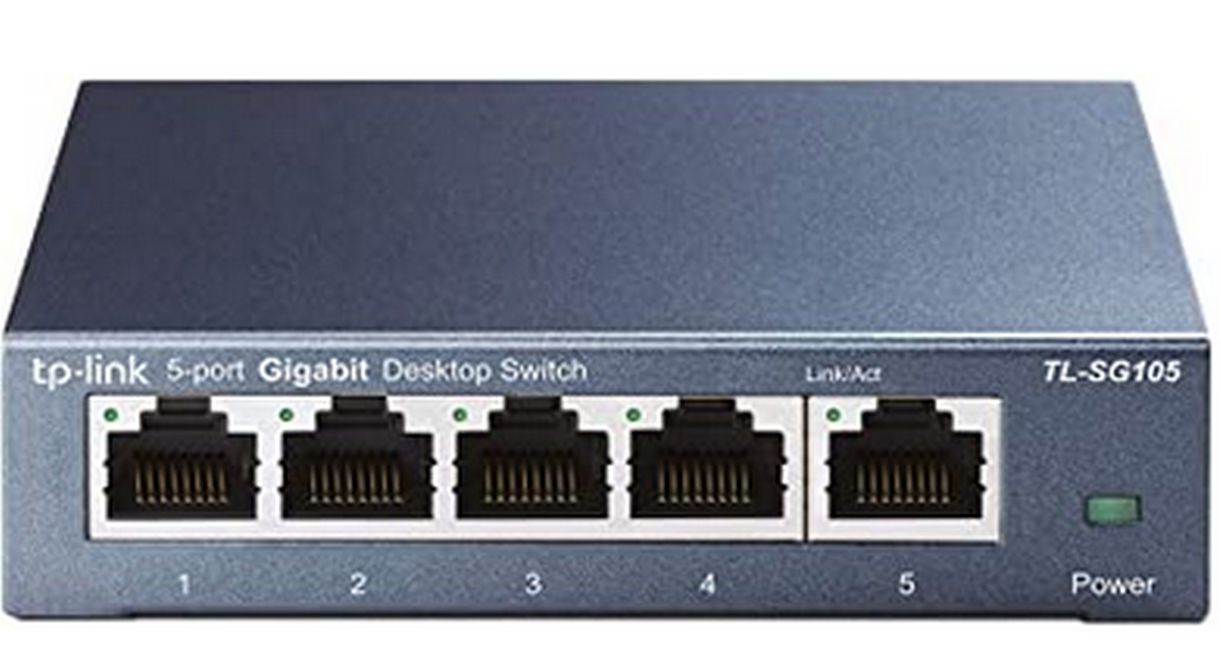
Unmanaged switches are plug and play - connect one of the ports to your existing router via Ethernet to receive additional physical Ethernet port connectivity via the switch. Plug and Play means easy setup with no software installation or configuration needed. Some switches require Windows software and passwords. We do not want this. We want a plug and play unmanaged switch.
You also need at least three 10 foot Ethernet Cables ($7 each or 5 pack for $18). A long cable is needed to connect the switch to your router (which may be in a different room). The switch should be in the same room as your laptop. You will then need a second Ethernet cable to connect the switch to your normal Ethernet port on your laptop. Finally, you will need a third Ethernet cable to connect the switch to your USB3 to Ethernet adapter (using a USB3 port on the left side of your laptop).
TIP: use Cat 6e, 7e or 8e Ethernet cables as Cat5e is being phased out and is no longer the standard. A 5 pack of 6e 10 foot cables is $18
Note: Having a 5 port Ethernet switch is also useful if you have several devices in the same room, such as computers, TV monitors or cameras, that each need their own high speed secure Ethernet Internet connection.
Connect Three Ethernet Cables
Plug your Ethernet cable from your router into the switch. Then plug another Ethernet cable from the switch to your laptop. Then plug a third Ethernet cable from the switch to your adapter and plug the adapter into a USB 3 port (typically located on the left side of your laptop). Then open Network Connections and click on the Wired connection 2 to select it. Then click on the Settings wheel to edit it.
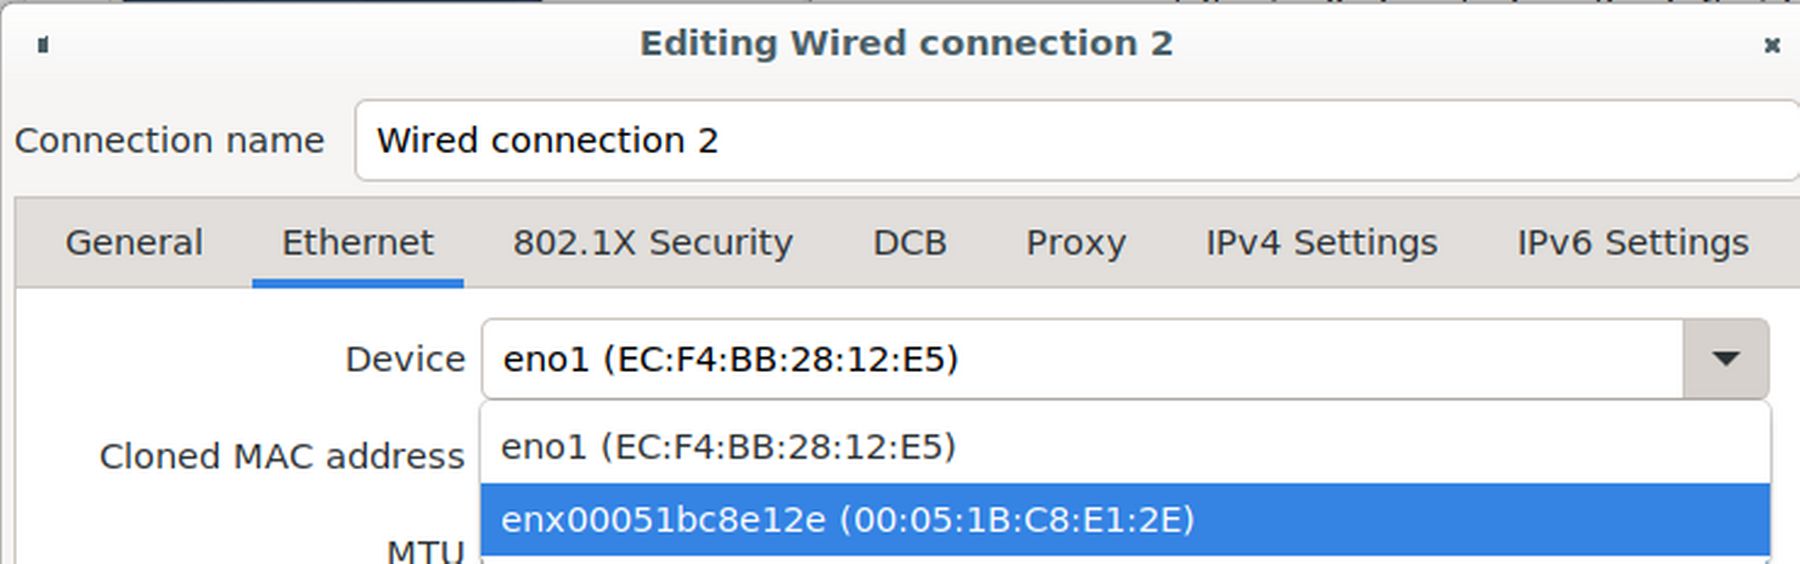
Note that you now have two Ethernet devices. The first device is called eno1. Copy and paste its name and mac address:
eno1 (EC:F4:BB:28:12:E5)
The new Ethernet device has a really long name that is very difficult to remember. Copy both the name and mac address of the new device:
enx00051bc8e12e (00:05:1B:C8:E1:2E)
The name of the new device is the first set of numbers and letters. The MAC address is the 12 digit code separated by colons. Change the device back to eno1 and close the Wired connection 2 edit screen without saving it by clicking on the Cancel button.
Change the name of the new Ethernet Device
To change the name of the new Ethernet device to something shorter, open your file manager and go to File System, etc, udev, rules.d folder. Right click on the screen and click Open as Root. Then enter your password. Then right click on the screen again and click Create New File, Blank File. Name the file 70-persistent-net.rules
Then open the file with a text editor and copy paste the following (first changing the mac address to the mac address of your new device and changing the name to the new name you want to use:
# This file was automatically generated by the
# /lib/udev/write_net_rules program
# You can modify it, as long as you keep each rule on a single
# line, and change only the value of the NAME= key.
# net device example try it without the KERNEL match condition
# SUBSYSTEM=="net", ACTION=="add", DRIVERS=="?*", ATTR{address}=="54:52:00:ff:ff:dd", ATTR{type}=="1", NAME="eth0"
# Change the MAC address and NAME to what you want.
# USB3 to Ethernet Adapter
# device original name enx00051bc8e12e mac 00:05:1b:c8:e1:2e
SUBSYSTEM=="net", ACTION=="add", DRIVERS=="?*", ATTR{address}=="00:05:1b:c8:e1:2e", ATTR{type}=="1", NAME="enx0"
Then save and close the file and close the file manager. Then restart your laptop.
Then open a terminal and type ip addr. You should now see the new device with the shorter name. But it has no IP address. Close the terminal and open Network Connections. Select Wired Connection 2. Then click on the Settings wheel. Then at the Ethernet tab, use the drop down to change the device from eth0 to enx0.
Then click Save and close Network Connections.
Then open a terminal and type ip addr again and press Enter. Note that the connection enx0 now uses the Wired Connection 2 Static Ip address. Then in the terminal and type nmtu to start the graphical interface. Then press Enter to Edit Wired Connection 2:
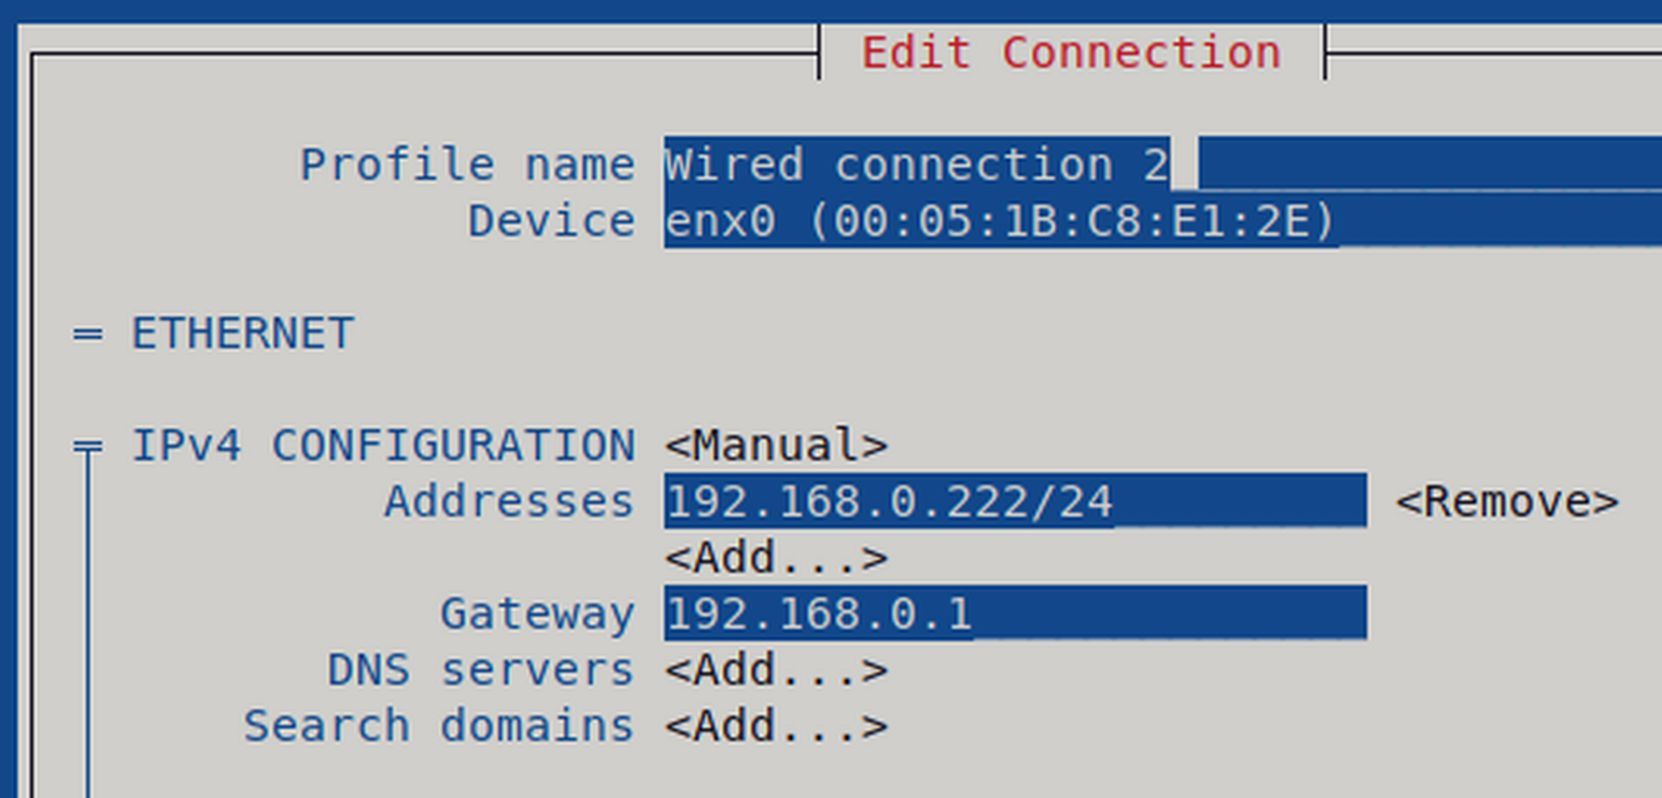
Then press Escape twice to return to the first screen. Then use the down arrow to select Quit and press Enter to close nmtui. Then close the terminal.
What’s Next?
Now that we have two Ethernet devices, we are ready to create our first bridge.