
Using a virtual private server involves transferring data over the public Internet to a virtual private server hopefully hosted on a Linux server that is not in the US. This data includes not only files, folders, images and videos but also user names, passwords, personal information of your customers and potentially even credit card and banking account information. Previous, we have introduced the concept of SSH for communicating with a remote server. In this article, we will look at how to change your SSH port to increase the security of your SSH connection to your server.
Hacker Heaven versus Real Data Transfer Security
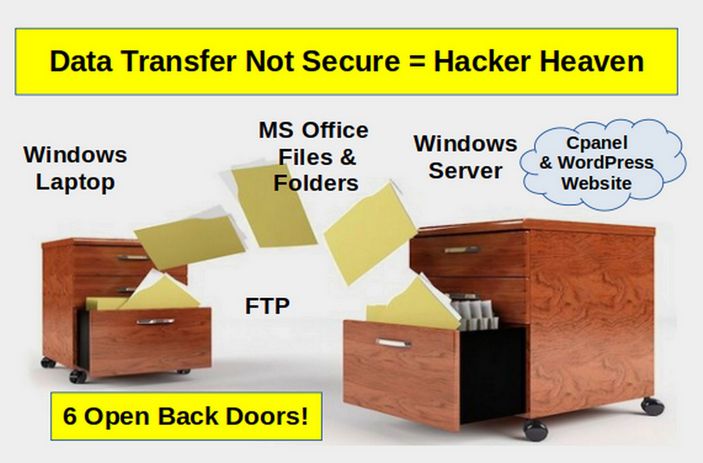
Before we get into keys and ports, we should begin with a review of other key components of data transfer security. A chain is only as strong as its weakest link. It does no good to use keys and ports to protect data transfer if other parts of your system are wide open to hackers. Sadly, the traditional business uses MS Office files created on Windows computers and transferred to a Windows server via FTP to a Cpanel File Manager and then displayed on a website with a WordPress Control Panel. Every one of these programs have open back doors that can be easily used by even novice hackers to steal your data, hack your website and lock up your computer. This is why I call the current lack of security a hacker heaven.
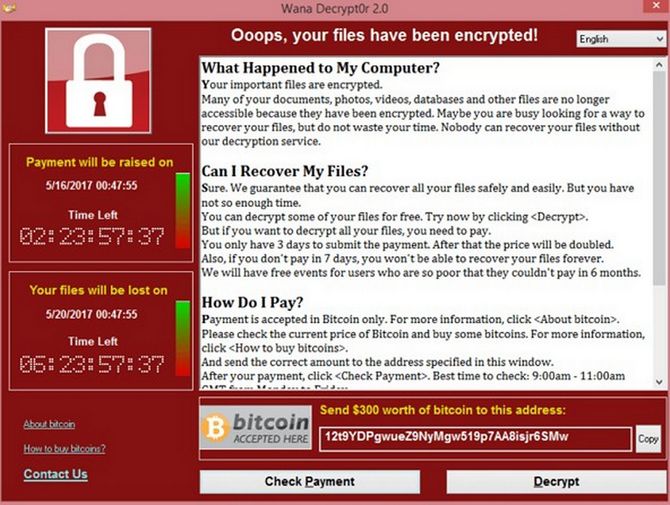
Then end result of failing to secure your entire information sharing system is that hackers will take over your computer and website and demand a ransom payment to get them back:
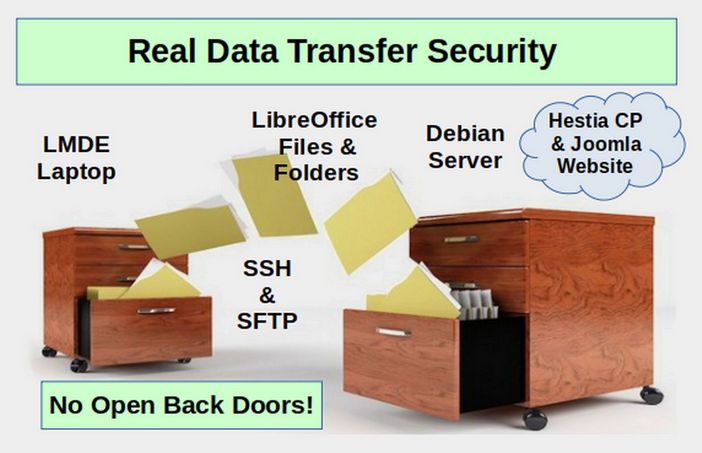
The only way to create a secure business website is to create secure Libre Writer documents on a secure Linux computer and then transfer them to a secure Linux server via SSH and SFTP to a Hestia Control Panel File System to be displayed on a Joomla website. If any one of these components is missing, then there is no point in using keys and ports. Security is all or nothing. If there are open back doors at any point in the process, hackers will eventually find them.
In this article, we will take a closer look at how your laptop is connected to your remote server. But always remember that creating a secure connection is only one small part in a much bigger process.
SSH versus FTP
FTP stands for File Transfer Protocol, a protocol that was created for the transferring of files from a remote location to a local computer, or vice versa. On the other hand, Secure Shell, or SSH, is network protocol that facilitates the communication between two computers. The problem with FTP is that it sends data such as usernames and passwords in plain text. This allows hackers to gain full access to your websites and even your computers. Despite this fact, most web hosts and web control panels, including Cpanel, still allow users to transfer files to and from their websites using FTP.
What is a Secure Shell
SSH stands for secure shell. But what exactly is a shell? A shell is your terminal or console. A Secure Shell is a shell or terminal that is accessed remotely with a user name and password and or a pair of public and private keys. Secure Shell (SSH) creates a secure connection when you log in to a remote computer. The reason SSH is more secure than FTP is that SSH encrypts your data before it is sent to your server.
What is a computer port?
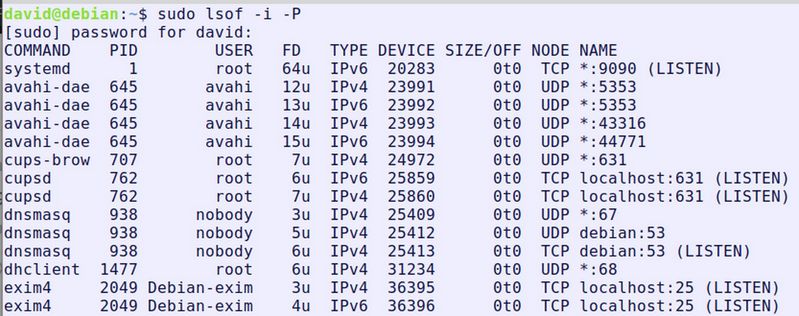
There are a lot of terms one needs to learn to understand computer security. A computer port is basically a channel like a radio or TV channel that your computer and server listen to and can receive information over. Ports can be either open or closed. They can also be blocked by firewalls. There are about 65,000 possible ports and computers can listen to more than one port at a time. You can determine what ports are open on your computer by opening a terminal and typing:
sudo lsof -i -P
You will get a result like this:
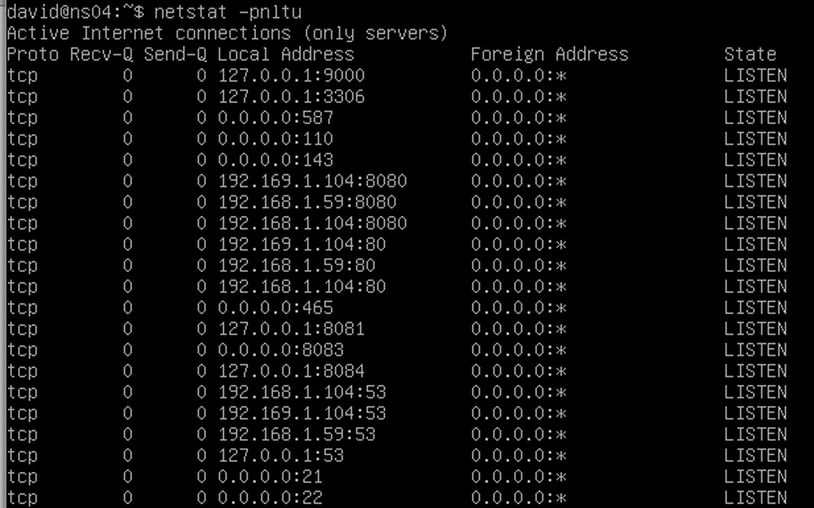
Type the same command into a running Debian 10 server and you will get this result:
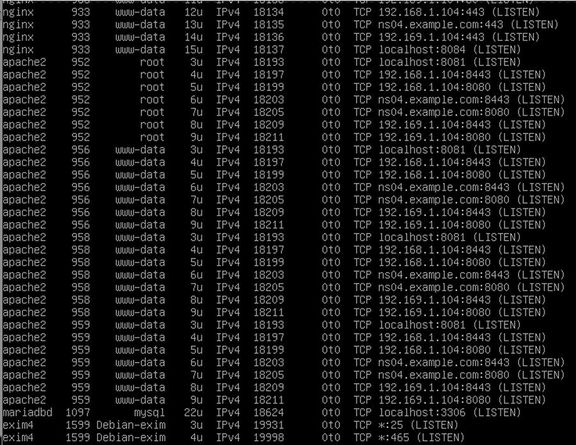
Type the same command into a running Debian 10 server with Apache server installed and you will get an even longer list:
Here are some common port numbers:
Ports 20 and 21: To transfer files between your computer and a remote server.
Port 22: Default SSH port
Port 25: Simple Mail Transfer Protocol (SMTP). SMTP is used for email.
Port 53: Used by DNS servers
Port 80: Used by HTTP Apache for insecure website connections
Port 8080: Alternative HTTP Apache port
Port 443: Used by HTTPS Apache for secure website connections.
Port 8083: Default Hestia Log in port
How to Change your SSH Port Number
One of the simplest things you can do to improve the security of your server is to change the SSH port. Since SSH defaults to Port 22, you will see a lot of brute force attacks occurring targeting Port 22 as most users do not take the time to change this default SSH port. Hackers use special brute force password cracking programs to determine your password and then log in to your Port 22. Because this SSH port provides full access to your server, hackers target port 22. Changing the default SSH port will prevent many but not all automated attacks. To protect your server from a brute force attack, you should change the default SSH port to something else.
Previously, we have installed the Hestia Control Panel on a practice Debian server using Virtual Machine Manager. We then set up an SSH connection from our home computer to our practice server with the following command in our Home computer terminal: ssh 192.168.1.59 (or ssh ns04). We also explained that this IP address needs to be a static IP address and our VPS needs to be using a bridge connection. Let's review how to change the SSH port to make it harder for hackers to access your server.
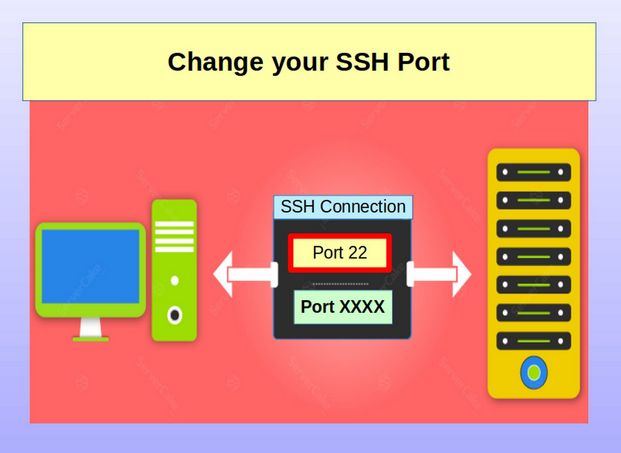
By default, SSH uses Port 22 but SSH can use other ports (above port 1024) provided that the receiving server is listening to these open ports and that firewalls allow access to these ports. The key to making this work is to also configure Hestia properly to listen to the open SSH port.
Step 1: Choose a new port number
In Linux, port numbers below 1024 are reserved for well-known services and can only be bound to by root. To avoid issues with port allocation in the future, choose a port above 1024. In this example will change the SSH port to 7777, but you can choose any port you want.
Step 2 Connect to your Server via SSH
Make sure your server is running by turning on Virtual Machine Manager and then starting your server. You do not need to log in. Then open a terminal on your home computer and type (replace the hostname or IP address with the hostname or IP address of your server). Turn on ns04 with VMM and open an SSH session with ssh root@ns04> (or ssh 192.168.1.59)
You will be prompted for the server password. Type it in and press Enter. You have now started an SSH session and can use your Home computer terminal to enter commands remotely in your server.
Step 3 Open your server sshd_config file
Graphically: Type mc to open Midnight Commander. Then click on the two dots to go to the root folder. Then click on the etc folder. Then scroll down and click on the ssh folder. Then select sshd_config and press F4 to edit it.
To open sshd_config via the terminal, copy paste: sudo nano /etc/ssh/sshd_config
Press Enter. Enter your server password and press Enter again.
Step 4: Edit the sshd_config file
Scroll down to Port 22 and delete the hash. Then add a new line below Port 22 and type Port 7777 in the new line. Then press Control plus o, then Enter to save the file and Control plus x to close the file.
Note: The reason we are adding Port 7777 rather than replacing Port 22 is that if the connection to 7777 does not work, we can log back in using Port 22 and try to see what we may have done wrong using an SSH session rather than trying to type commands directly into the server terminal. Once we verify that Port 7777 works, then we can go back into our sshd_config file and delete Port 22.
Step 5 Open Port 7777 on your VPS Server
Click File, Exit to exit MC and return to the server terminal. The default firewall in Debian is called IPTables. (Actually, it is now called NF-Tables but the process for changing port numbers is still the same). To change IP Tables to open the new port, copy and paste the following into your terminal:
sudo iptables -A INPUT -m state --state NEW -m tcp -p tcp --dport 7777 -j ACCEPT
Then press Enter. Enter your password and press Enter again. Restart the SSH using
sudo systemctl restart ssh
Then type exit to exit the SSH session.
Step 6 Open Port 7777 on your Hestia Control Panel
Log into your Hestia Control Panel by opening a web browser and entering the Admin Log in URL:
192.168.1.59:8083
(Note: If you do not recall your server IP, log into your server and type: hostname -i)
Then click on Settings, Firewall
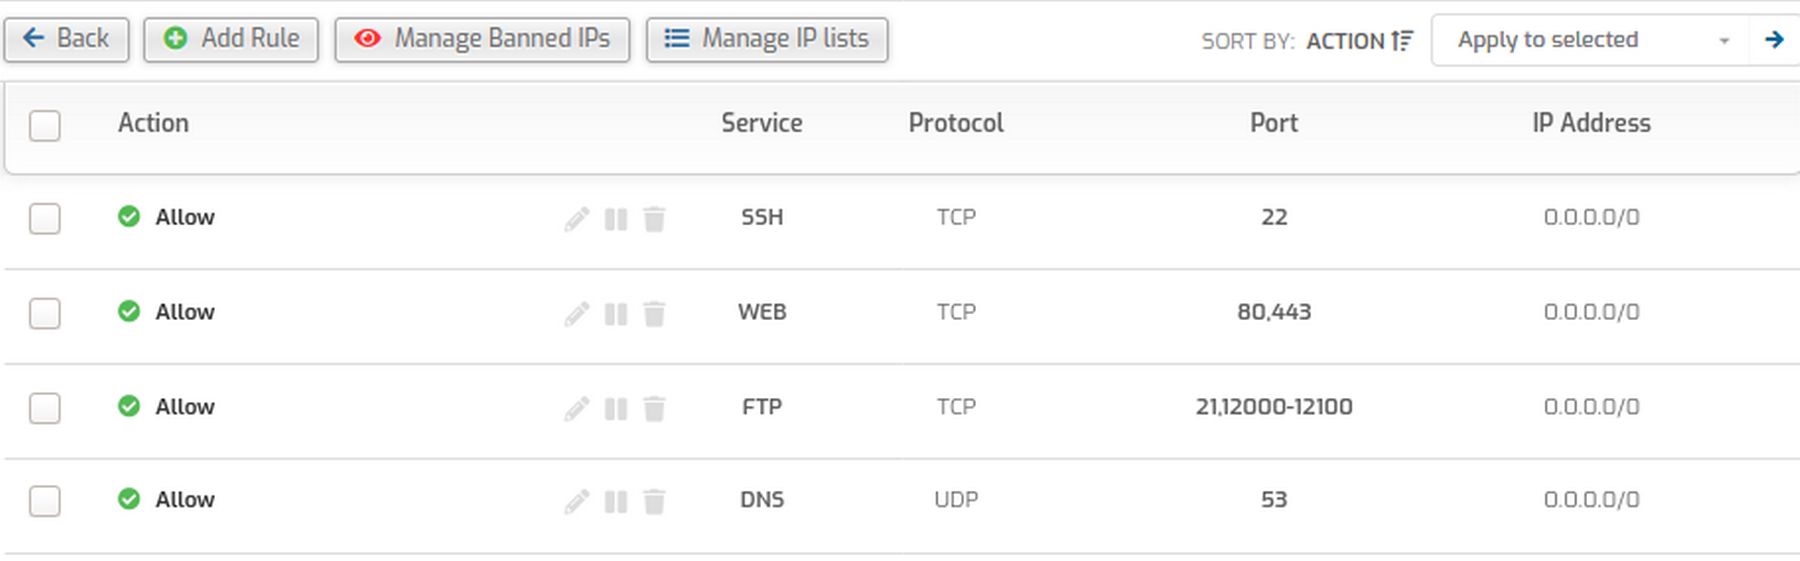
Click Add Rule
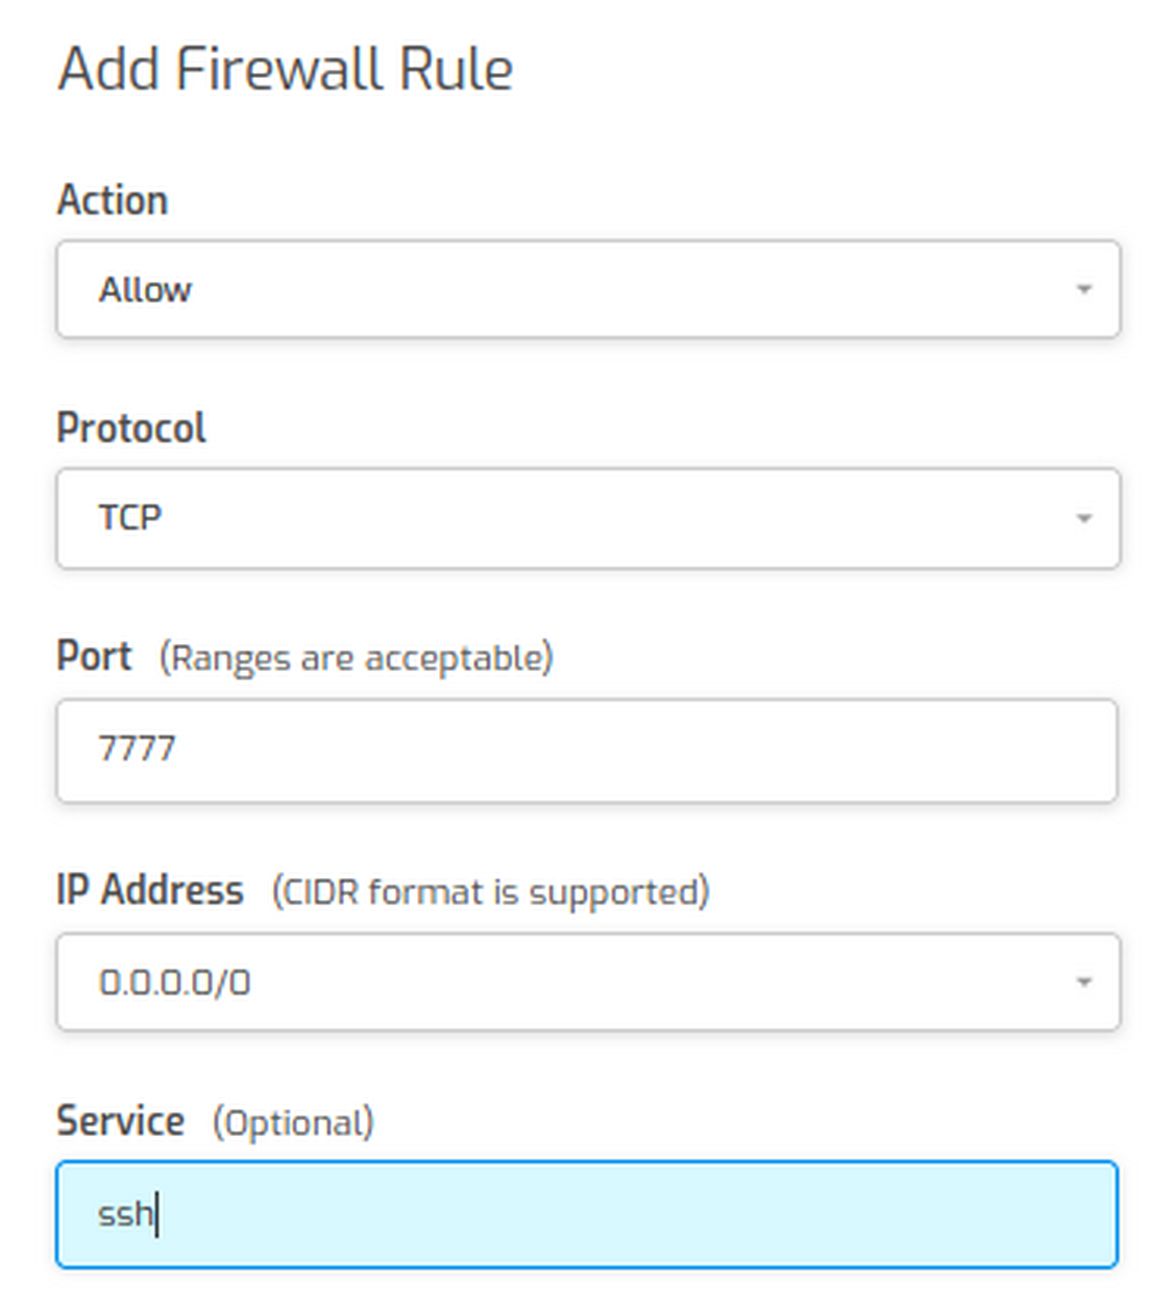
For IP address type 0.0.0.0/0, which will apply the rule to all IP addresses. Then for the Service box type SSH. Then click Save and Back. Then log out and close your web browser. Then restart your server and watch it start in VMM to see if Apache server starts properly.
Step 7 Start an SSH session using the new port
Start the SSH session using the new port number with
ssh root@ns04 -p 7777
Then type exit to end the SSH session and try logging in with
ssh root@ns04>
Sadly, this will lead to a Connection Time Out error as you can only use this shortcut SSH log in is when you are using Port 22.
However, there is a way that you can log in with the short cut method and without having to enter or remember that you are using Port 7777 for your ns04 server. That way is by creating and using a special SSH configuration file. We will do that next.
Create an SSH Configuration File on our Home Computer
We have previous changed the SSH server configuration file which located in the server /etc/ssh folder and is named sshd_config. Here we will open our Home computer file manager. Right click and click Show Hidden Folders. Then scroll down and open the dot ssh folder. Then right click and click Create a New Document, Empty Document. Name the file config.
Change Permissions on your SSH Configuration File
We do not want anyone other than you being able to change or even view your configuration file. Therefore, right click on the file and click Properties. Then click on the Permissions tab. Then change the group and public access from Read Only to None:
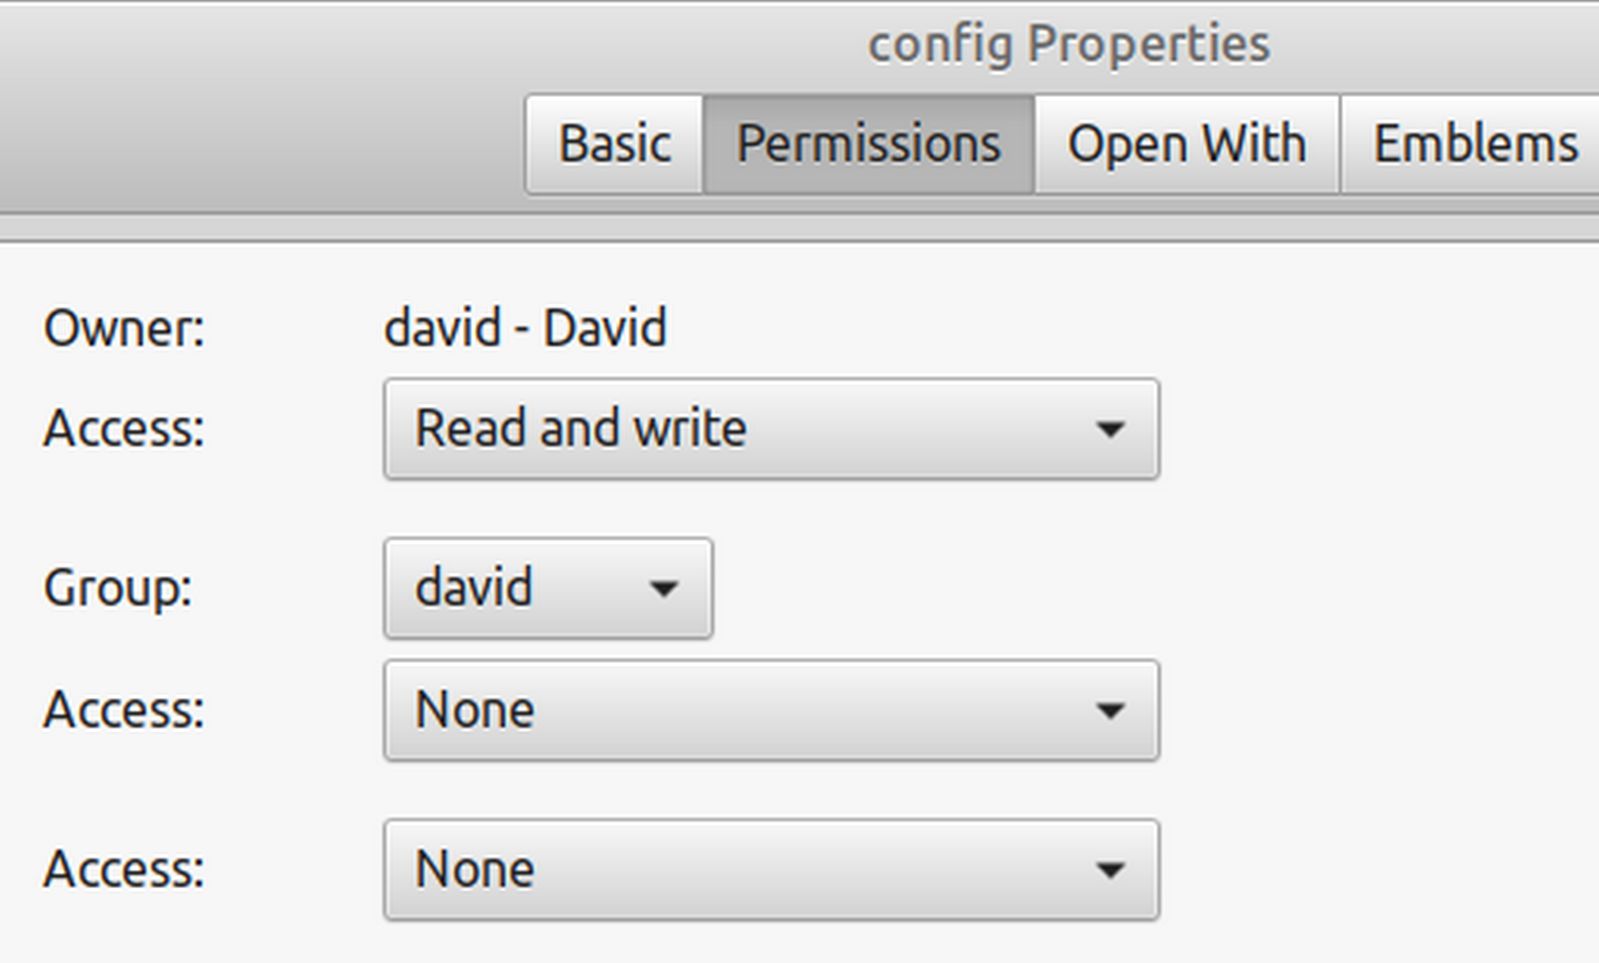
These permissions are called 600. Then close the Properties screen.
Edit your SSH Configuration File
Open the file with a text editor and type the following:
Host myvps (you can use any name for your simple host name)
Hostname ns04.example.com (You can alternately use your IP address for your hostname)
User Root (you can also use your user name instead of root)
Port 7777 (change this to whatever SSH port you are using).
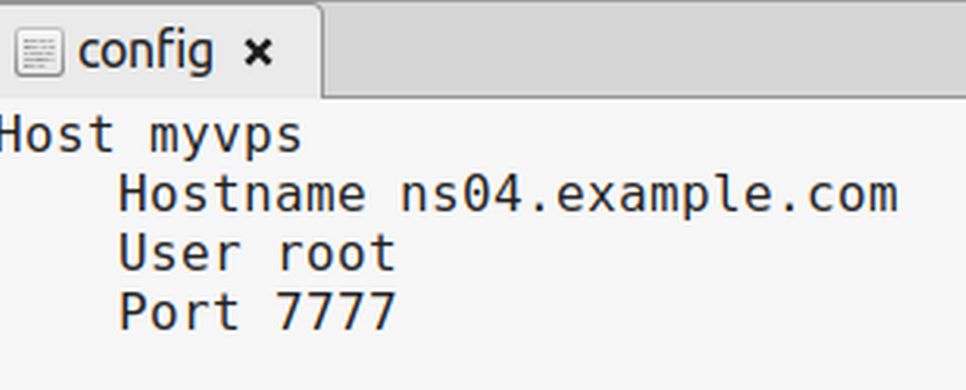
Then save and close the file. Now instead of starting an SSH session by typing ssh
When you run the above command, ssh looks for a Host named website in the ~/.ssh/config. If it finds a host with that name, it gets all the information related and used it for making an SSH connection. If you have more than one SSH connection, you can list them in the same SSH configuration file.
How to tell if a Port is Open
When changing port numbers, sometimes, you may make a mistake such that your SSH connection no longer works. It can be helpful to see if the port number is actually open. There is a tool called Net Cat that is installed on both your LMDE home computer and your Debian server. Here is a command to verify that Port 7777 is open on the server ns04: nc -zv ns04 7777. If the port is open, it will reply: Connection to ns04 7777 port [tcp/*] succeeded!
Change the Hestia Control Panel Login page to a different port
By default, we can log into our Hestia Control Panel with our server IP followed by a colon followed by 8083 for Port 8083. We can also log in with our server hostname followed by 8083. However, given the importance of the Hestia control panel in protecting and running all of our websites, it is also wise to hide the port used by Hestia. To do this, log into your Hestia Admin page and click on Settings, Firewall. Then click Add Rule.
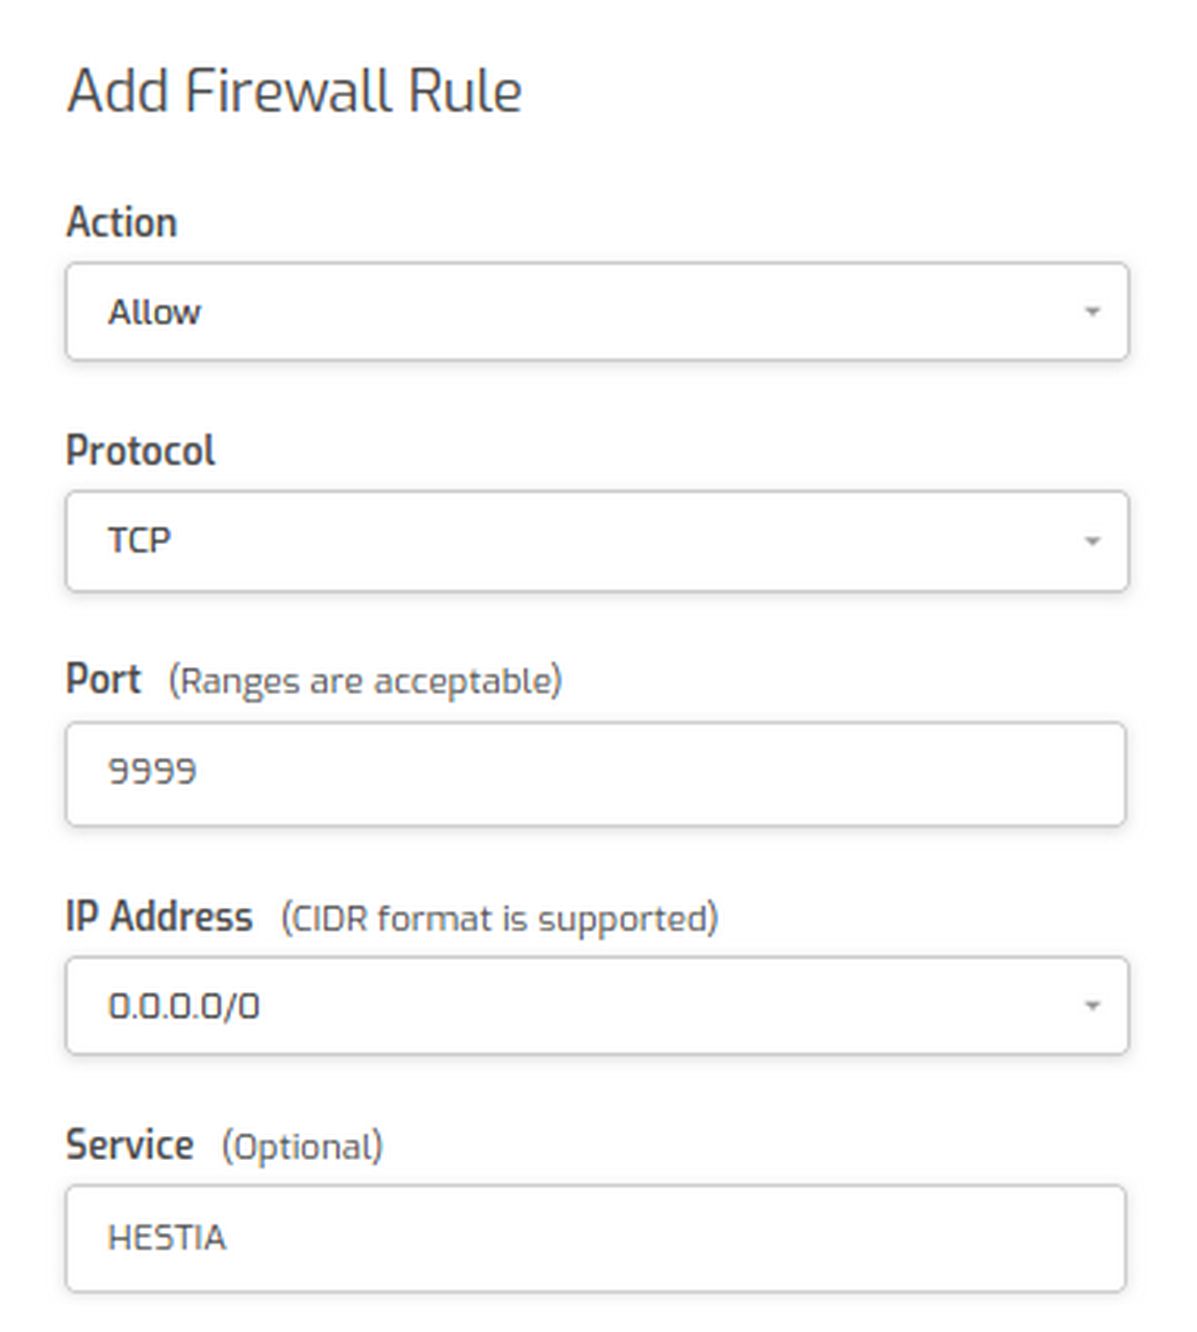
For Action, click Allow. Protocol is TCP. Enter the new Port number. Enter 0.0.0.0/0 for the IP and type HESTIA for service. Then click Save and Back. Next in an admin ssh session, copy and paste
v-change-sys-port 9999
Then copy and paste
service hestia restart
Then log out of Hestia. Then open a new browser tab and log in at
ns04:9999 or 192.168.1.59:9999
Click Advanced, Accept Risk.
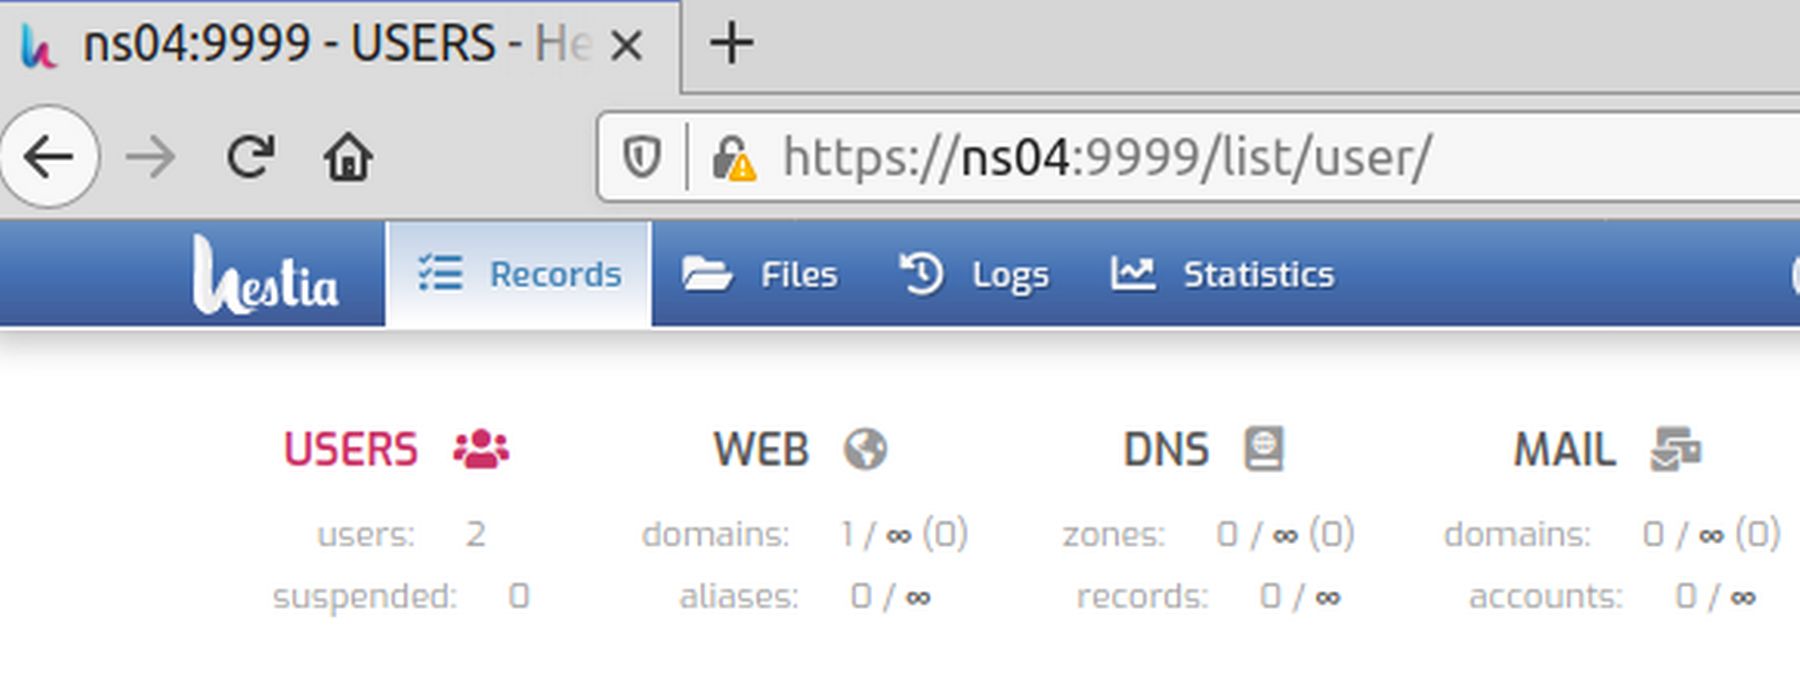
Now that we know that Port 9999 works for log in, go to Settings, Firewall and delete the open port 8083.
Congratulations! You know have custom ports for both Hestia and SSH
What's Next?
Now that we know how to use ports to improve security, in the next article we will review how to create keys to improve security.