
In this article, we will review how to route certain domain names to certain IP addresses using a file called etc/hosts. But first a bit of history. When I first began working with the Internet (about 100 years ago), there were no real websites and there was not a Domain Name System (DNS). There were only a few destinations (perhaps 10, with each being the computer department of a major university). Each had an IP address like 123.456.789.0. You would go online through a phone connection and type in the IP address. There was an actual list of these IP addresses, called ARPANET, that was like a phone book where you would look up the IP address for the university you wanted to connect with.

By 1981, the number was 213 host computers, with another host connecting to the ARPANET approximately every twenty days. Back then, we thought this was rapid growth. Then someone (perhaps Moses) decided to use human readable names and link these names to there IP address so people did not need to remember the IP address or even look up the IP address. This was many years before the development of the Linux operating system. This was even before the development of the Windows operating system (aka dirty.dos aka dr.dos) (which was actually created by Gary Kildall not Bill Gates).
Moses created a file called hosts which just listed the IP address of their university connection followed by name they were using. Anyone could then reach them using the name smart-u instead of the IP address 123.456.789.0. After the Linux operating system was created in the 1990's, a person named Ian (whose wife was named Deb), decided to put this file into a folder called etc.
And this is why today, in the Debian operating system, the file is known as etc/hosts. When you are working with the host file, you are actually working with history that pre-dates the Linux Debian operating system.
It was only later, after the Internet became popular, that the DNS system was developed. Today, the world has about one billion websites and one billion IP addresses.

The hosts file was never intended to list more than a few websites. But for a few websites, the hosts file is actually much easier to work with than DNS resolvers.
Understanding Host Names
A host name is the name of your computer or the name of your VPS. For example, when you installed the Linux operating system on your laptop, you may have given it a name like lmde or debian. This is your home computer host name. You will see the host name whenever you use the terminal as the prompt is username (at) hostname. For example, david@lmde...
When you set up a VPS, you may have given it a name like server01 or ns01. This is the host name of your VPS. A host name can also be the first part of a Fully Qualified Domain Name. If you assigned the host name server01 to your VPS and the domain name example.com, then server01.example.com would be a Fully Qualified Domain Name or FQDM.
The purpose of the etc/hosts file is to match the host name of your VPS with a specific IP address for the VPS. In order to send network traffic to a host, the numeric Internet Protocol (IP) address for that host must be known. The IP address is written as xxx.xxx.xxx.xxx where each xxx represents a value from 0 to 255, for an IPv4 network address. Computers require these numerical IP addresses. But humans find a 12 digit string of numbers difficult to remember. The Domain Name Service (DNS) provides a mechanism to associate one or more alphanumeric names with a numeric 12-digit IP address.
Any IP to domain name mappings contained in the Hosts file overrides any information that would be retrieved from a DNS server. In fact, if there is a mapping for a domain name in a hosts file, then your computer will not even bother querying the DNS servers. The DNS resolver consults the local /etc/hosts file first. Only if the host name is not found there, will the DNS resolver consult the remote DNS name servers identified by the /etc/resolv.conf file.
Examples of /etc/hosts files
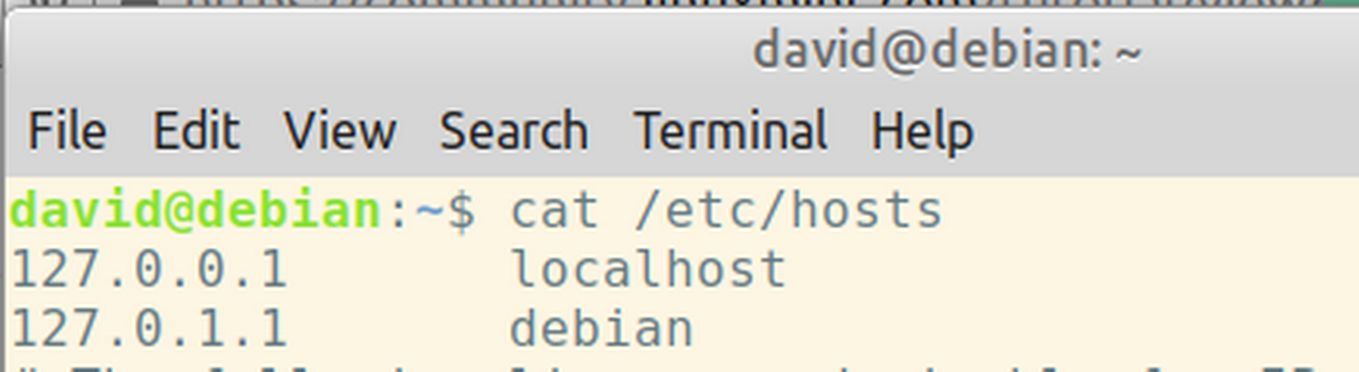
pen your home computer file manager and click on File System. Then open the etc folder and scroll down to a file called hosts. We will not cover the IP6 section here as we want to focus on the first two lines which are the IPv4 section. This lines should read:
127.0.0.1 localhost
127.0.1.1 debian
Where debian is the name of my laptop. Your laptop name may be different. Close your file manager. You can see the same file by opening your home laptop terminal and typing cat /etc/hosts
Now use VMM to open your VPS. Log in and type cat /etc/hosts

The format on your VPS is SOURCE-IP FQDM HOSTNAME
Each line in a hosts file consists of an IP address in the first text field followed by one or more hostnames, with each field separated by white space (either blanks or tabs). You should not use any web notations such as https://
Both files list the source IP address as being the gateway address of your Local Area Network - 127.0.1.1. The hosts file for our Home computer does not list the FQDM. Both hosts files list the Host Name. The problem is that listing only this local IP address will not allow us to connect to our Hestia Control Panel. We will therefore need to add one or more additional IP addresses to our etc/hosts file. Here is an example of an etc/hosts file with four IP addresses:
<IP> <Fully Qualified Domain Name> <hostname>
127.0.0.1 localhost
192.168.0.111 ns03.example.com ns03
192.168.0.113 mail.example.com mail
You can use your hosts file to override IP addresses that your DNS server provides. When you add an entry to your HOSTS file, it automatically start working. There is no need to reboot or enter another command to start using the new entry in the HOSTS file.
Associating Host Names and IP Addresses
After the IP address, the entries show the locally-known hostnames associated with that IP address. By convention, the first name after the IP address is the fully-qualified domain name. An example of a FQDM would be server01.example.com; this is the official name of the host. Any remaining names defined for the IP address are aliases or alternate names for the official host name. For example, suppose that one of the duties assigned to server01.example.com is to be the corporate FTP site. A suitable alias might then be myftp.example.com and this name could be added to the /etc/hosts entry after the FQDM. Many times, an alias is simply the host name, without any domain suffix. For example:
192.168.10.12 server01.example.com myftp.example.com myhost myftp
The advantage to listing the FQDM host name as the first definition on the line is that IP-to-hostname conversion (similar to reverse DNS lookups) usually display only the first name found; convention uses the FQDM name for this.
Editing the hosts file
We have created a server called ns03 with a domain name called example.com located at a local network that we want to access. We usually have to type the server’s IP into the browser to access it unless it has been defined on our local DNS. One way to avoid typing the IP, which can be hard to remember, is to assign an alias to the server in the hosts file. We will edit the hosts file so that we can access a remote computer (our VPS) through an alias. Open a terminal on your home computer and type
sudo nano /etc/hosts
Then enter a new line and type
192.168.0.214 ns03.example.com ns03
where 192.168.0.xxx is the IP address for your VPS and ns03.example.com is the FQDM of your VPS as determined by running your VPS, logging in and typing ip addr.
5r
To save the change, type Control plus o, then Enter.
To close the file, type Control plus x.
IMPORTANT NOTE: This method will only work if the host VPS has a static IP address.
Using a local host name
Open a terminal on your home computer and type:
ping -c 3 example.com
You should see that this domain name is active. It may have an IP address like 93.184.216.34
ping -c 3 93.184.216.34
Next type
ping -c 3 ns03.example.com
This domain is active and has an IP address of 192.168.122.18.
Now type
ping -c 3 ns03
Even just typing the hostname ns03 shows that it is active on the local network.
Now type nslookup ns03.example.com
It will reply:
Server: 192.168.0.1
Address: 192.168.0.1#53
** server can't find ns03.example.com: NXDOMAIN
NS lookup can only find the Gateway IP and not the actual IP of our domain name.
Only the Gateway IP for our domain name is found. The point here is that while the command ping will accurately trace the route to ns03.example.com on our local network, the commands host or nslookup will not consult etc/hosts and will therefore return an incorrect answer. This is why we should use ping rather than nslookup.

Using a local domain name to log into your VPS via SSH
Previously, we have logged into our VPS using SSH followed by the VPS IP address. For example, copy paster this into your host terminal:
ssh 192.168.0.214
Recall that this only works if the username on our host or home computer is the same as the username on our VPS server. But it is hard to remember the IP number 192.168.0.214
After adding the entry for ns03.example.com to our etc/hosts file, we can SSH into our VPS using the domain name instead of the IP address. Use Virtual Machine Manager to turn ns03 back on. Then open a terminal on our home computer and type:
ssh ns03.example.com
You will be asked if you want to add this domain name to your trusted list. Type yes. You will then need to type in the password for ns03. You will then see your terminal prompt change from the normal prompt, for example david@debian to the VPS prompt for example david@ns03.
Log out of the ns03 SSH session with sudo poweroff. Then restart ns03. Next type
ssh ns03
You will be asked if you want to add this domain name to your trusted list. Type yes. You will then need to type in the password for ns03. You will then see your terminal prompt change from the normal prompt, for example david@debian to the VPS prompt for example david@ns03.
We can now SSH to our VPS simply by remembering the name of the VPS.
End the SSH session with sudo poweroff
What's Next?
Now that we have our host file properly configured on a VPS, and before we install Hestia on our VPS, we first need to review the question of local versus public IP addresses and domain names.